

Follow Lilach
Wondering how to create great marketing videos without breaking the bank?
Wondering how to create great marketing videos in a short time and without breaking the bank?
Over the years, the video has grown as a content format. For instance, YouTube is now the second most popular website online – in the whole world.
And apart from YouTube, social media sites like Facebook, Instagram, and others now see video as an integral part of their service. And the reason for this? People love videos.
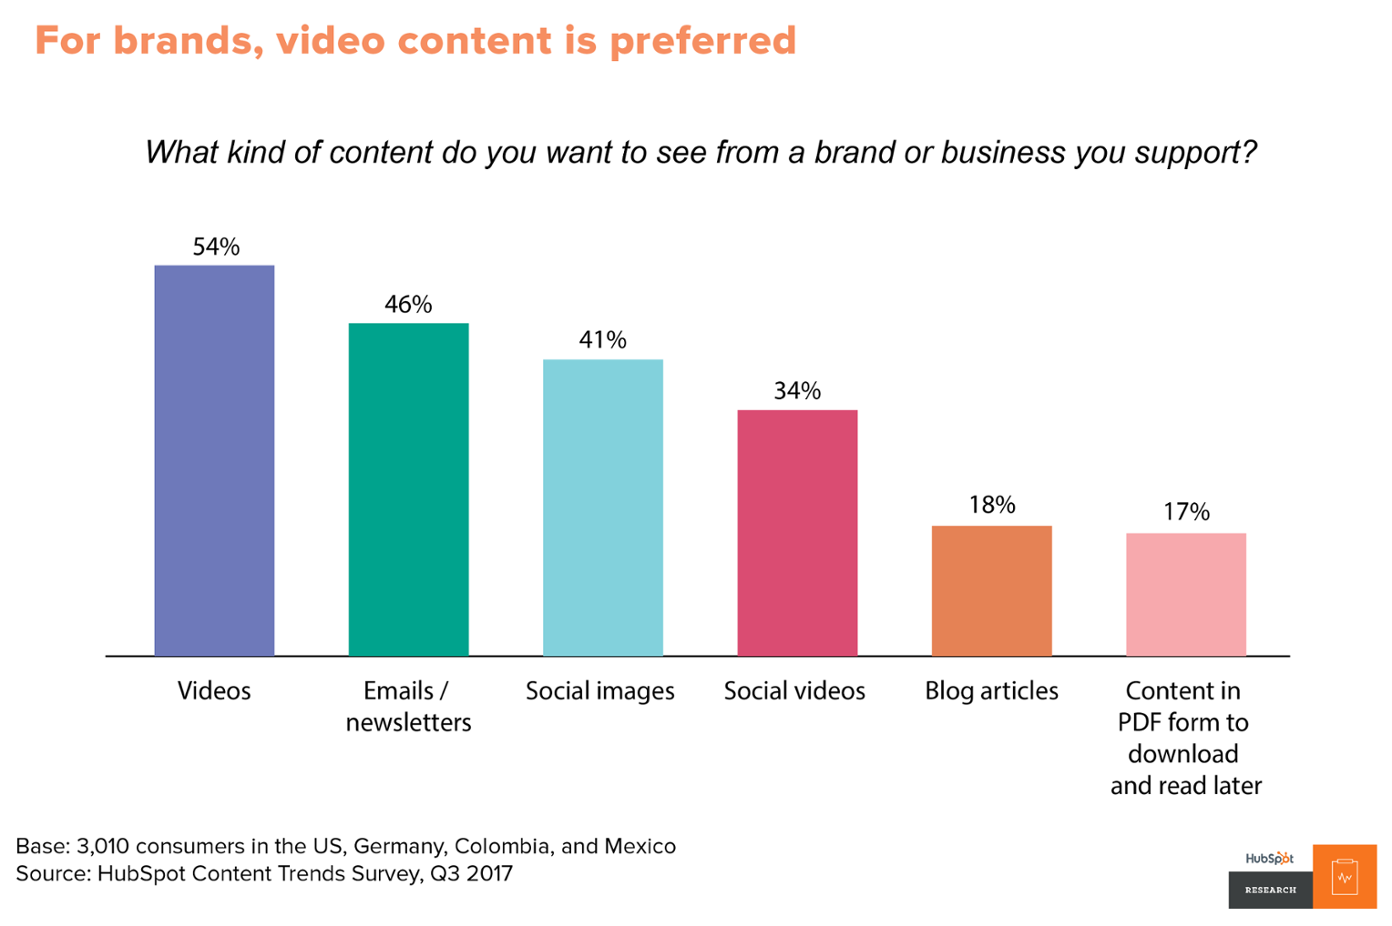
According to a HubSpot study, 54% of consumers expect video content from businesses.
One other factor that has aided the popularity of videos is that there are now a lot of tools to help create videos.
With the right video tool, you can create new videos or edit your videos for better marketing campaigns. Here are 6 factors to consider when picking a video tool:
- Your video needs: are you about to shoot a Hollywood blockbuster or just need a short video for your next social media campaign? The frank truth is that there’s a video tool that’s best for your needs. State your needs clearly.
- Ease of use: rather than making your life easier, a video tool with a steep learning curve will make it more difficult. You should go for a tool with a simple and intuitive interface that makes it easy to carry out basic tasks.
- Budget: your marketing budget determines the tool you can go for. Find a tool within your budget that can meet your needs.
- User reviews: what do current users say about a tool? This can show you whether the tool will be the right fit or not.
- Free trial: in some cases, you might just have to try out the tool yourself to form a personal opinion. Then it becomes easier to make your purchase decision.
Why WeVideo?
If you’re not sure where to get started with video marketing, I’ve just had the opportunity to try out WeVideo – and it’s a really easy to use tool with some amazing capabilities for businesses and marketers.
This software-as-a-service (SaaS) tool provides all the tools and features you need to create and edit videos from scratch, easily.
Whether you run a business, teach children, or need personal videos, WeVideo is built to meet your needs. And here’s why:
- It’s very easy to use and you don’t need to have any experience with video creation to create professional-looking videos
- It’s perfect for marketers and businesses: when it comes to your everyday needs for creating marketing and business videos, WeVideo offers pretty much any feature you need to create videos completely from scratch
- It’s surprisingly cheap for its capabilities and can pretty much work around any marketing budget – the cheapest package is $4.99/month which definitely makes it one of the more affordable options in this niche
- There’s a completely free version – which you can sign up for here – which is arguably a lot better than a free trial: it lets you see if the tool is right for you with no obligations
So, how exactly can you use WeVideo to create a professional video?
Before we move on though, you have to note that this is a review of WeVideo Business account. Therefore, you might find features like collaboration and the creation of templates, which are absent in other plans.
WeVideo Quick Start: How to get started with WeVideo in 3 steps
Before I get into all the features and details, I do want to look first at how easy it is to create a video; there are basically 3 main steps:
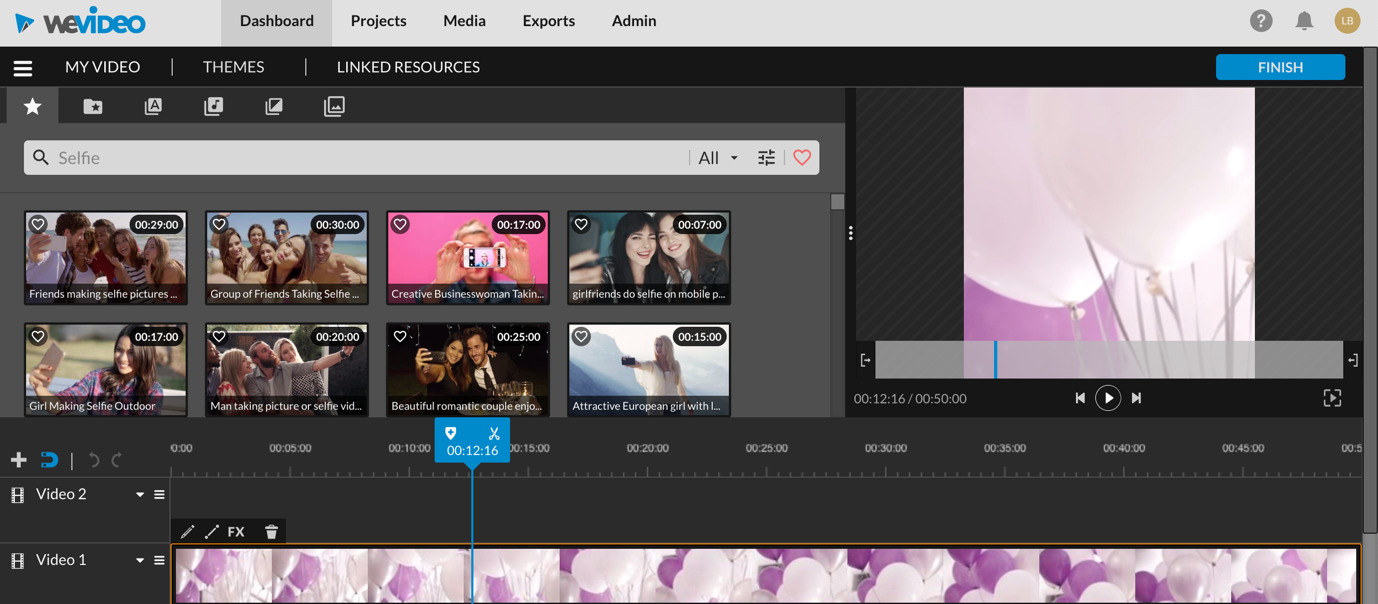
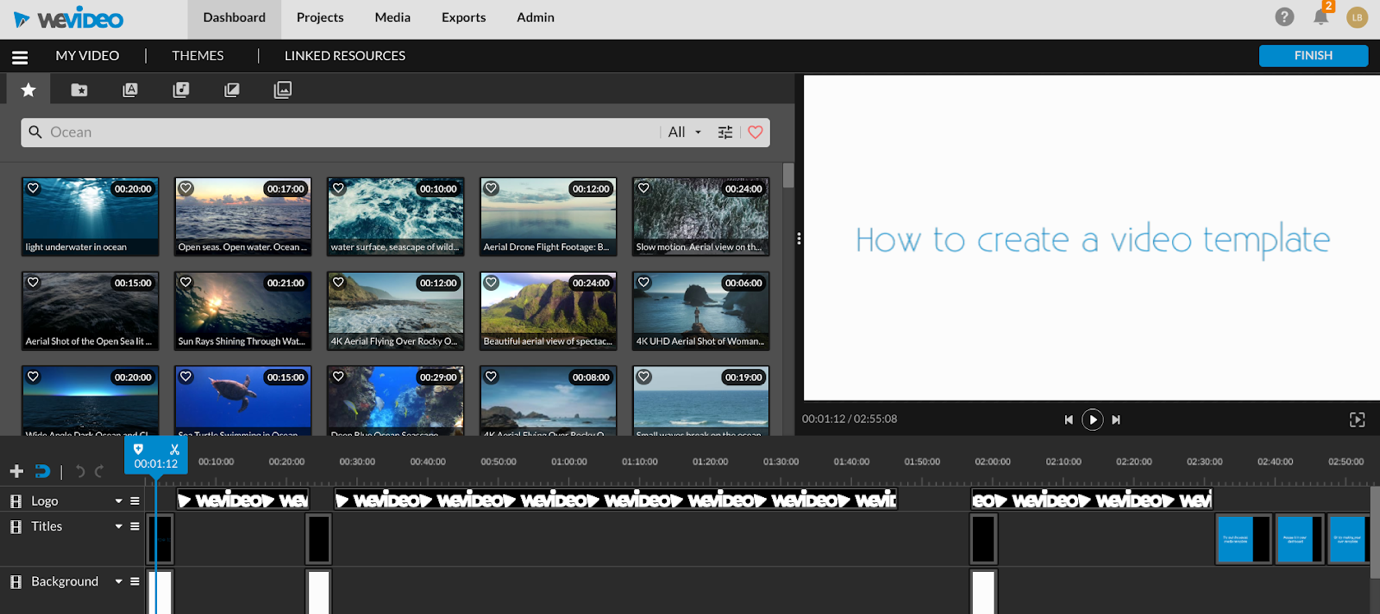
1. Uploading media: the first step when starting a new video is, quite simply, to upload media to your video – you can search through their extensive stock library of video clips to select the ones you like, or even upload your own or both:

2. Editing your video: once you’ve selected the media you want to use in your video, the next step is to edit and customize your video to your liking. This is surprisingly easy to do (and as I mentioned earlier, you don’t need to be an experienced editor or graphic designer), but I’ll get into all the editing options later on (just keep reading to learn more about the editor); plus, they have some great themes you can use to automatically make your video look better
3. Publishing your video: once it’s all edited to your liking, it’s time to publish; when you click that Finish button, you’ll see the numerous optimized options for saving and/or sharing your video:
It’s no secret that video marketing is on every marketer’s lips: it’s the biggest trend of the year and most experts expect this trend to continue and grow in 2020.
So if you haven’t tried video marketing yet, now is the time: WeVideo is a great starting point because of its ease of use – but also because you can try out for free to see if it’s the right tool for you (sign up for the free account here) ☺
Now that you have a much better idea of what WeVideo is, let’s take a more in-depth look at their platform and how it all works. So if you want to learn more, here’s a more detailed walkthrough of WeVideo:
1. Starting a new video edit: creating projects
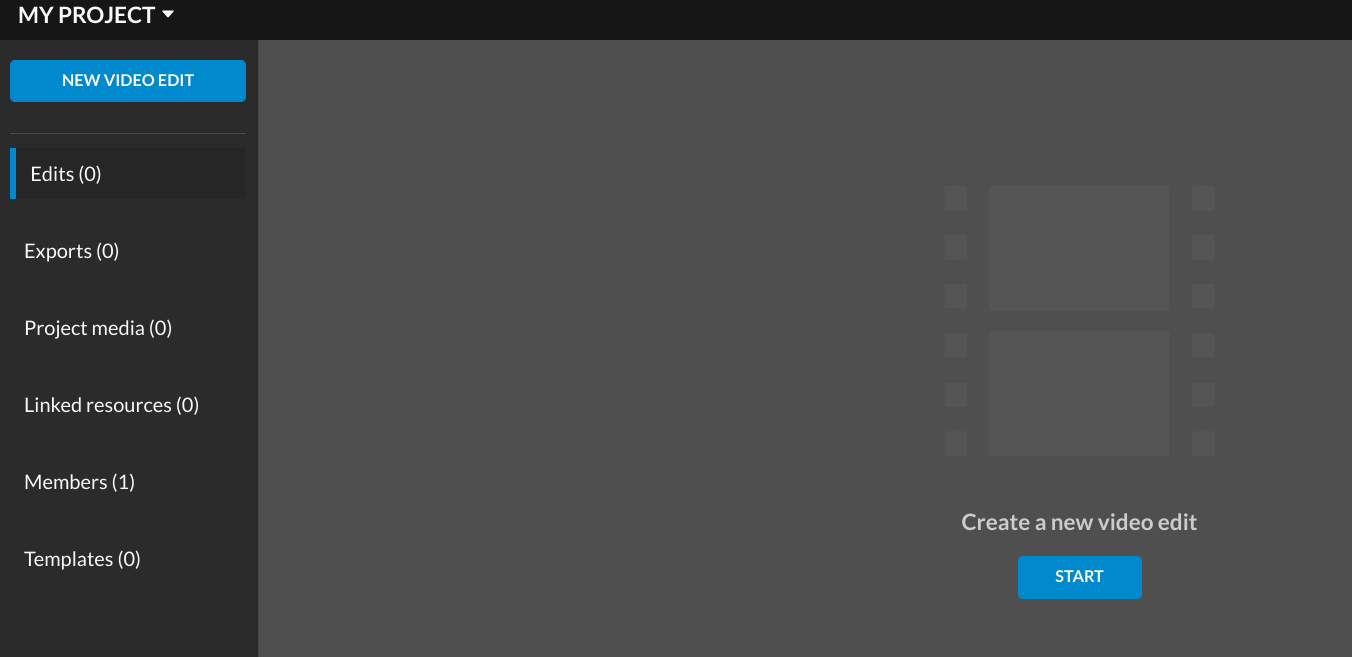
Once you’ve created your account, the first thing you can do is create projects.
A project allows you to organize your marketing videos for a particular campaign. Then, you can easily track your created videos and know where to find them, for each campaign or project.
In the “Projects” dashboard, your projects are evident with all the details.
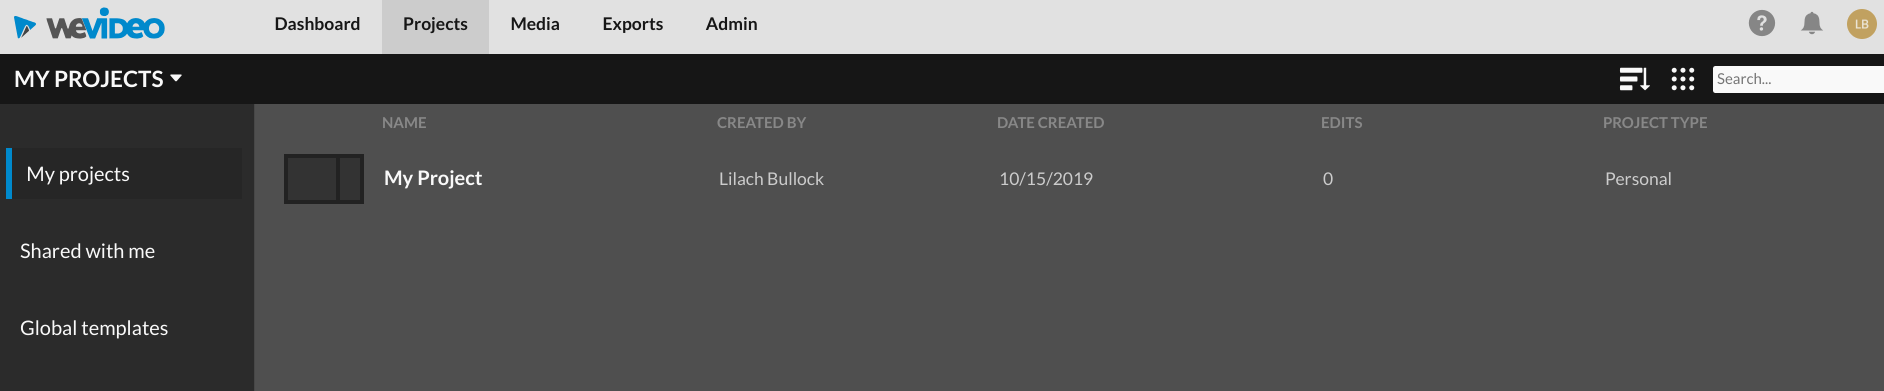
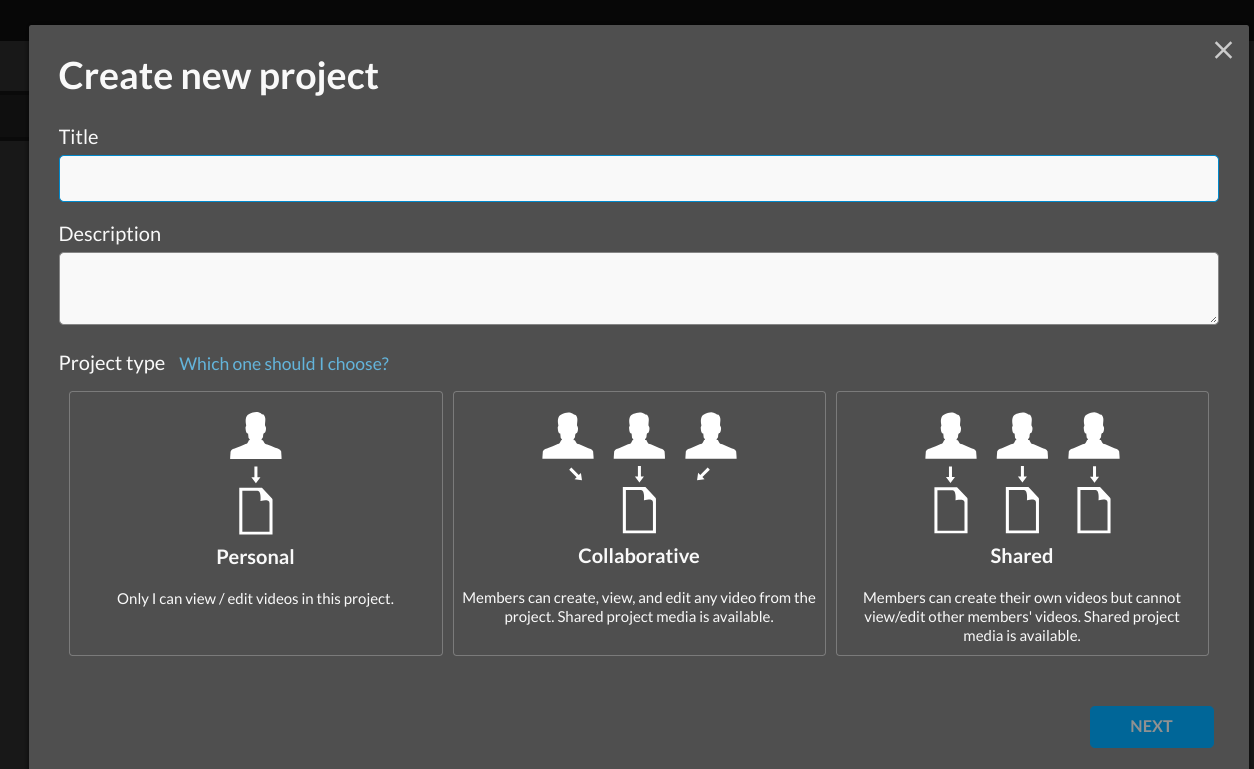
If you want to create a new project, click the “+” button at the lower right side of the page. Once you do that, you can add a title, description, and project type. The project type helps you to select an option to edit your video alone or collaborate with your team members.
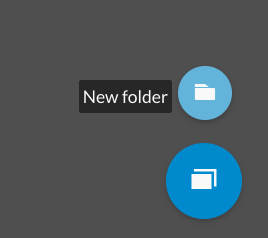
Apart from creating a project, you can also create a new folder where you have your projects.
Now that the projects are ready, it’s time, of course, to populate them with videos.
Creating a new video edit
In your main dashboard, there’s an option to create a new edit or use the social media post template:
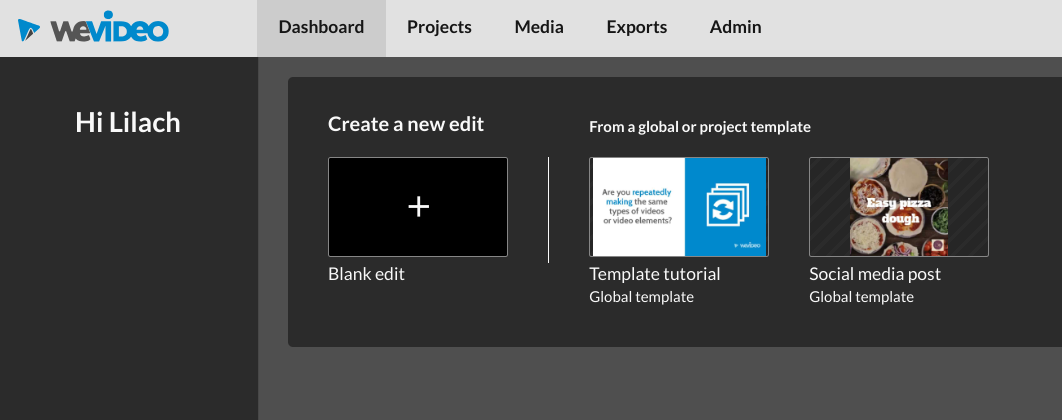
From the blank edit, you can create as many templates as you want. This is necessary for a video type you might need regularly. To get more information about how to create a tutorial, click “Template tutorial” and WeVideo will take you through the steps.
When you create a template, it will appear on your dashboard, with the pre-determined format. If you select a blank edit, you’ll have to select the format for your video. The present formats are:
- Horizontal
- Vertical
- Square
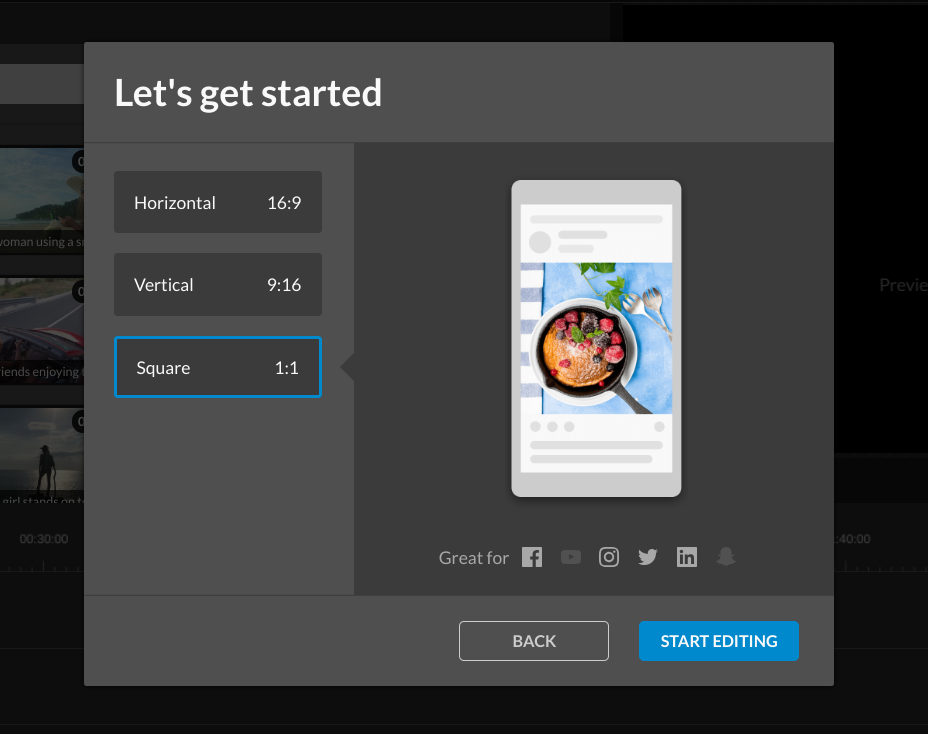
Obviously, the format you select will depend on how you intend to use your video and where you want to publish it.
You can also start video edits from within one of your projects. Click “Start” to begin:
When you do that, you’ll get an option to create a video from scratch or use one of their templates. After doing that, select the “Start” button.

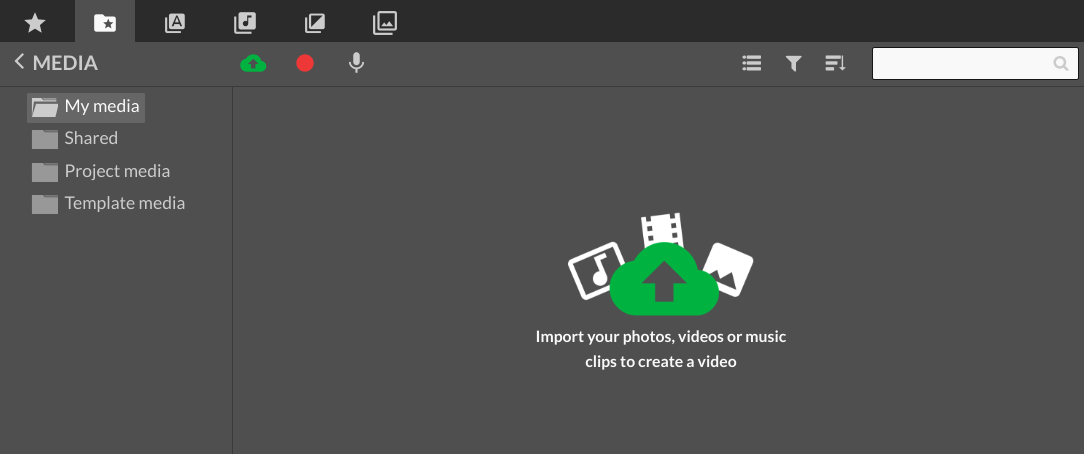
On the next page, you’ll see all of the stock videos, images, and music you can add to your template.
Or, you can always upload your own media:
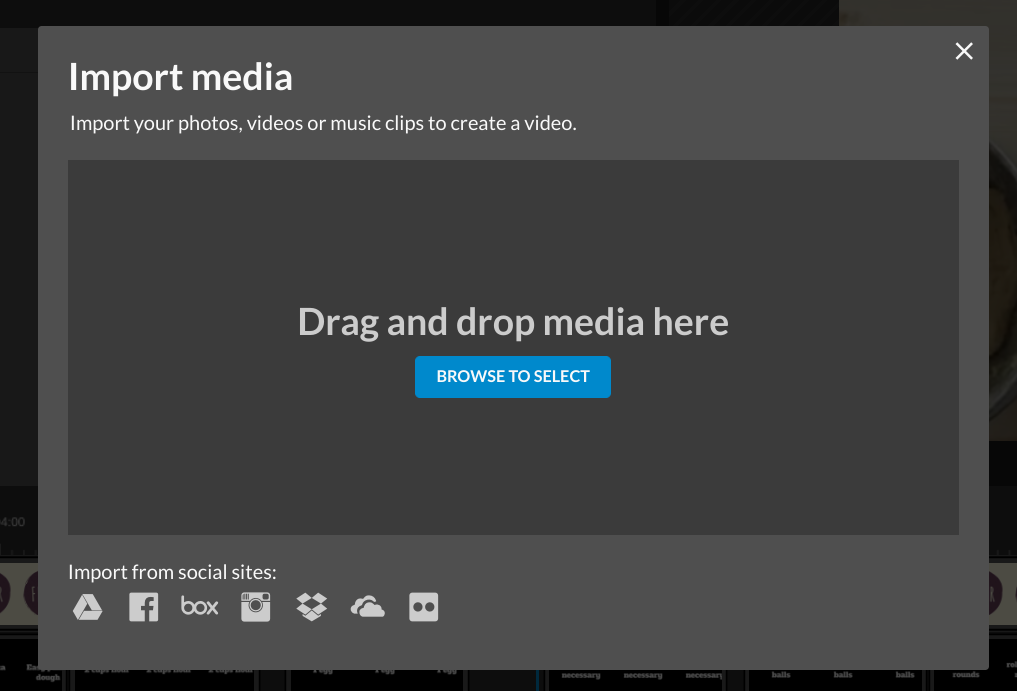
Importing your own files
In the Import tab, you can upload files from your online storage accounts like Dropbox or Facebook, among 5 other services, or from your device’s hard drive.
Also, WeVideo is an official Dropbox partner which makes it easier to import files from Dropbox to WeVideo.
The beauty of WeVideo is that its JumpStart technology allows you to start editing your videos even before you finish uploading:
This makes your editing task easier if you’re uploading large video files as there’s no need to wait for the upload.
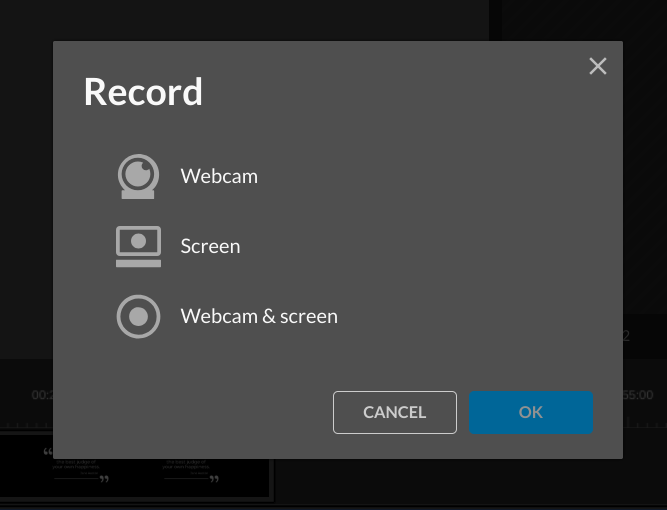
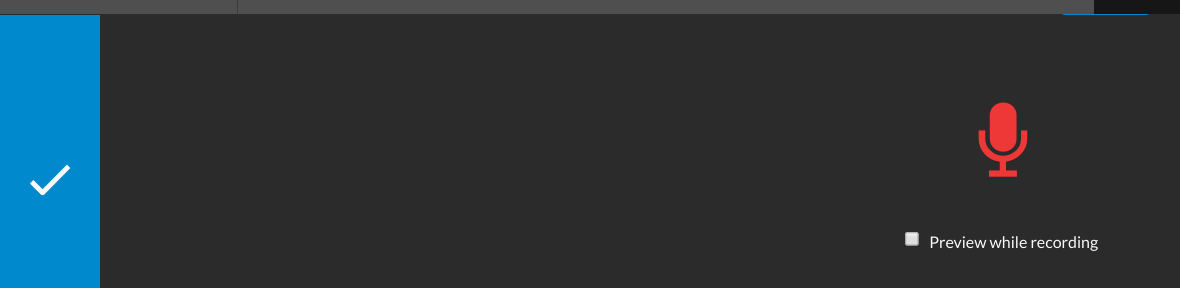
You have 4 options for adding relevant media to your video:
- Import media
- Use video or screen recorder or both simultaneously
- Open voice recorder
- Essentials stock content
WeVideo puts no limit on the size of the videos, images, and music you can upload, although you have to consider the size available on your account.
To use the second option (your webcam, screen capture, etc.), you can either record your screen or use the webcam. Another option is to combine the webcam and the recording screen; You’ll find this useful if you want to create a tutorial or how-to video, for example, as you can also record your voiceover narration concurrently.
The third option is to use a voice recorder. If you want to create a voiceover, then this is a great option – although I do recommend you get a microphone for any voiceover you do, so that it all sounds great.
Plus, don’t forget to add subtitles anyway – some people watch videos online with the sound off and this ensures they’re not missing anything (especially on social media!)
Add flair with WeVideo Essentials’ Stock Library
One of the problems you might run into as a business or marketer is that you simply don’t have the budget to film your own video clips.
Luckily, it really doesn’t matter – you can get a plethora of videos on pretty much any subject you can think of, directly in the WeVideo editor.
In fact, WeVideo has an impressive million+ pieces of commercially licensed media that you can use in your videos (and with the Professional and Business plans, you have unlimited use of these clips).
It’s also easy to find the videos you need, specifically, by entering a relevant keyword into the search bar.
You can even refine the search by choosing the type of media on the search. Plus, you can also favorite media for quick access in the future
In other words, you really don’t need to film anything yourself – just use any of the video clips readily available in WeVideo.
Adding a theme
If you want to add music, transition, and color filters to your videos, choosing a theme will do this in a single click.
To add a theme to your video, click the “Theme” tab at the top of your video editor. When you select a theme, you can also select what part of the theme you want to apply to your video. Then, click on “Use this theme.”
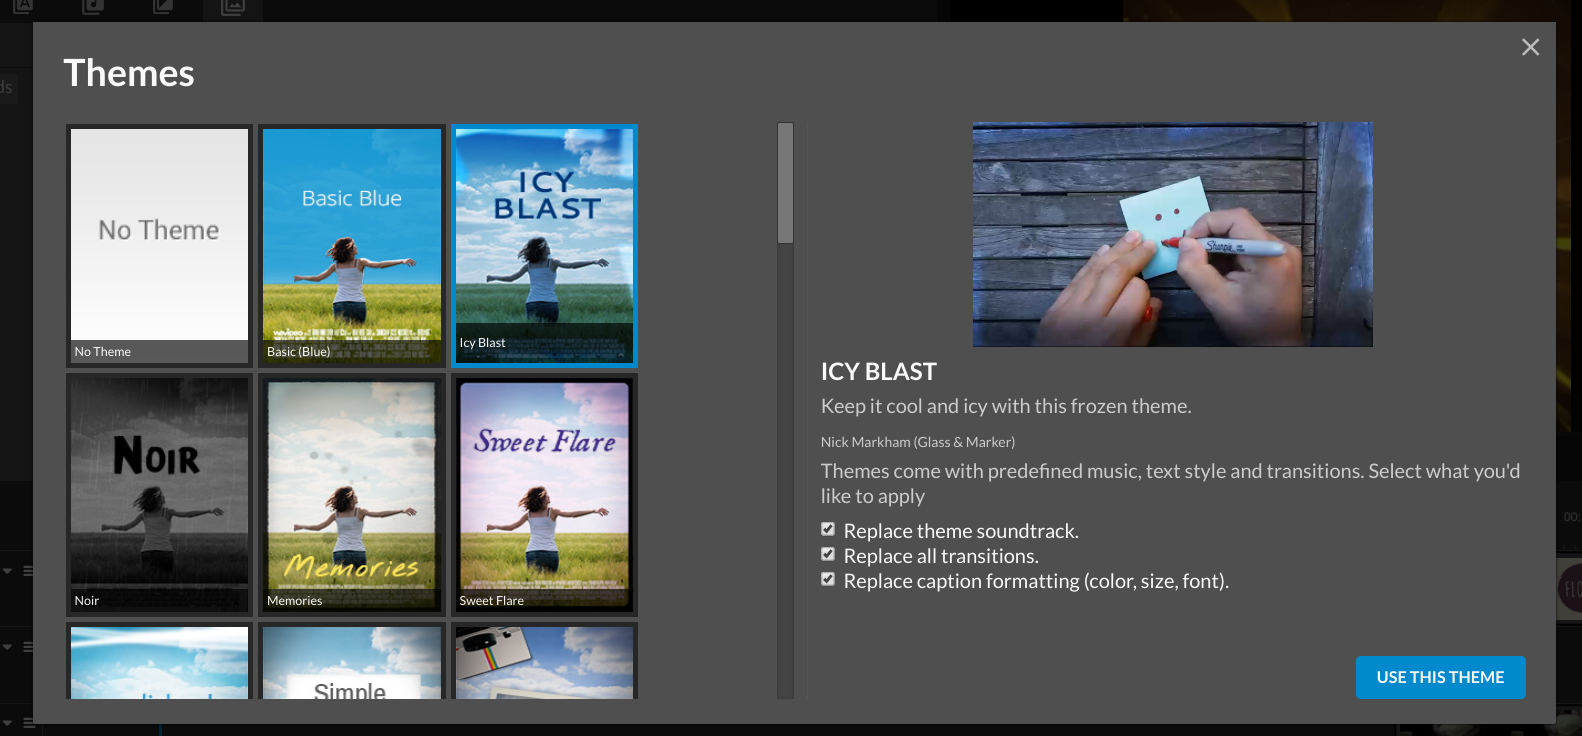
After applying the theme, you’ll notice that the video has changed considerably:
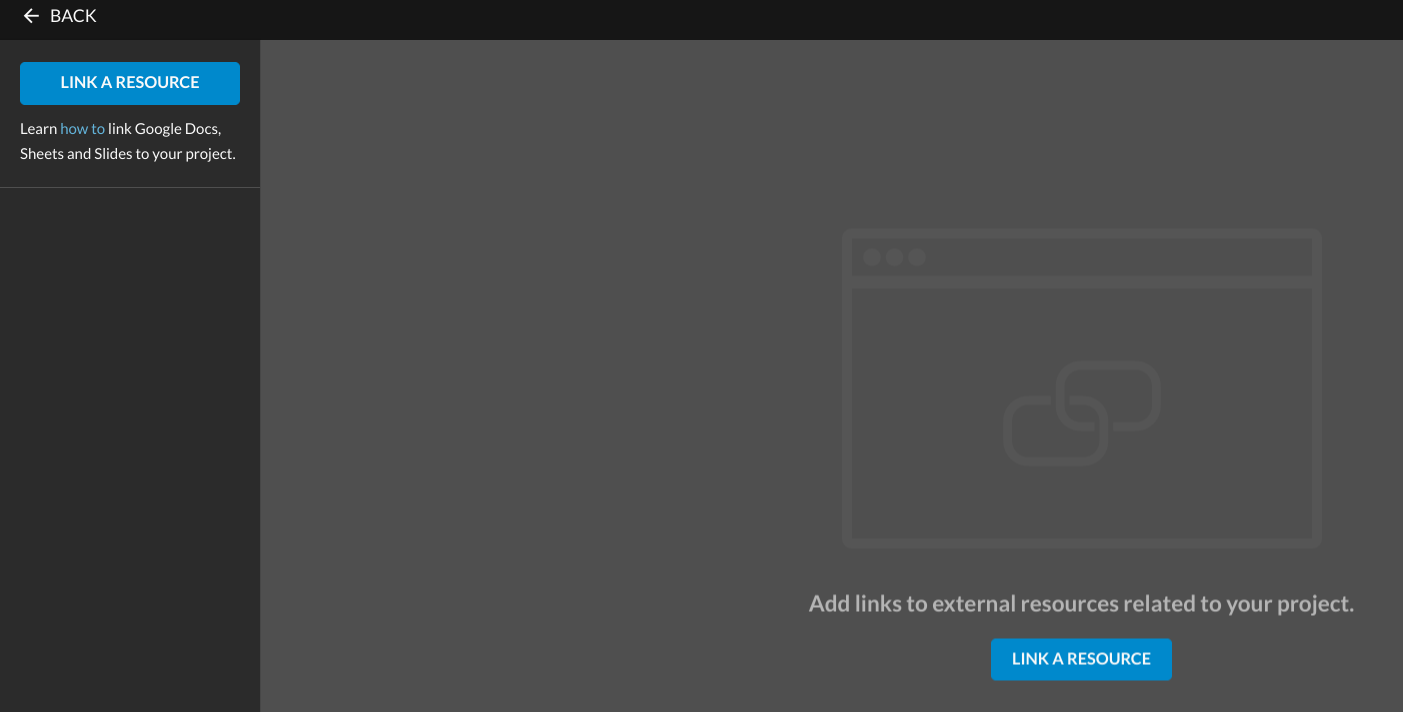
Another option is the “link resources” tab. Here, you have the option to link your Google Docs directly to your project in order to ensure easy collaboration with your team:
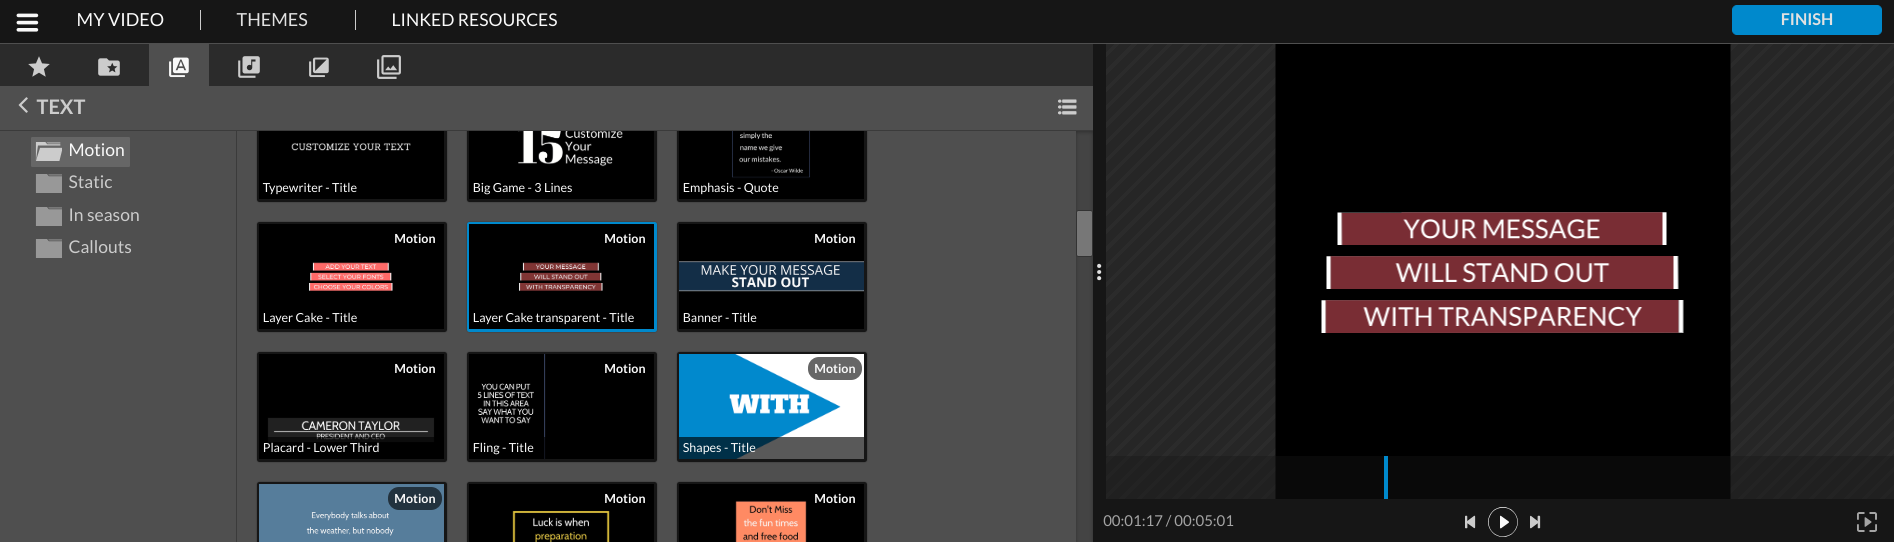
More video editing features
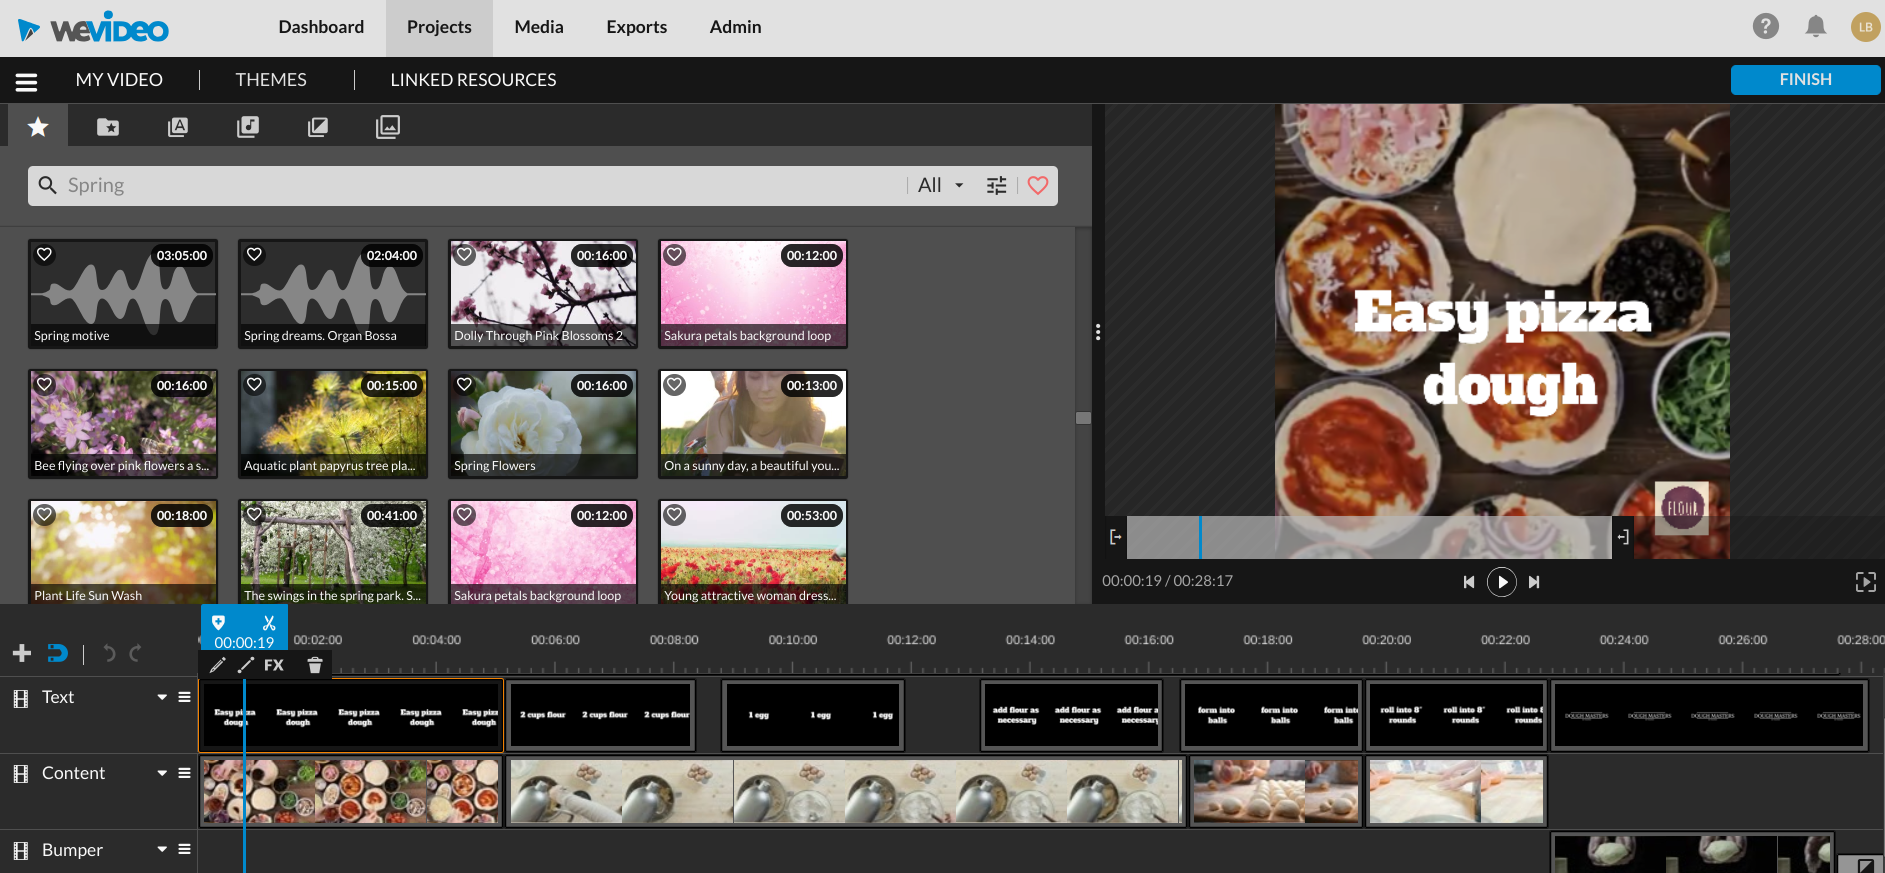
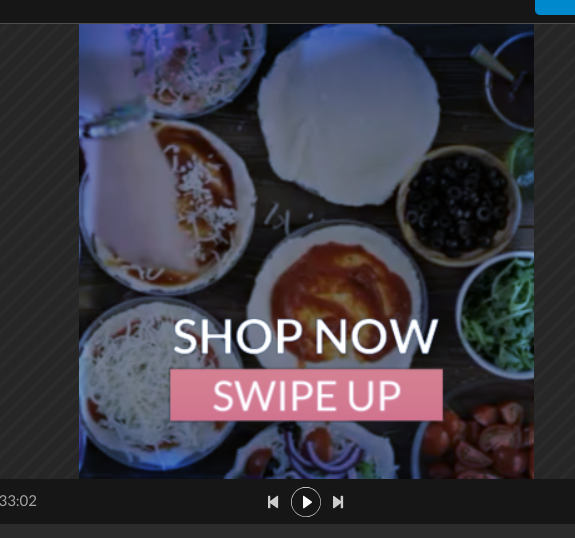
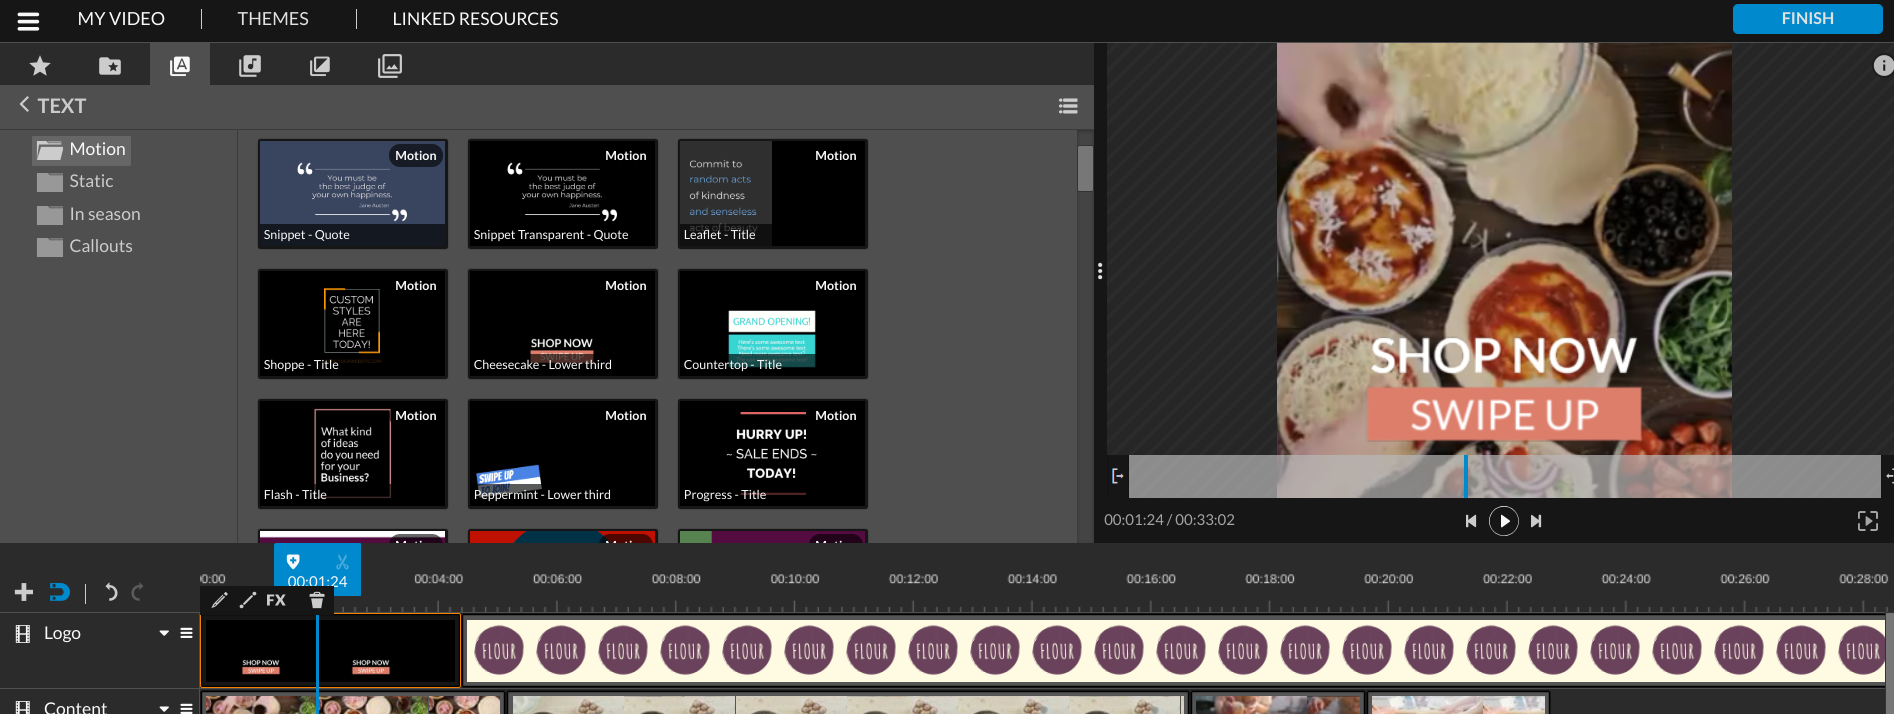
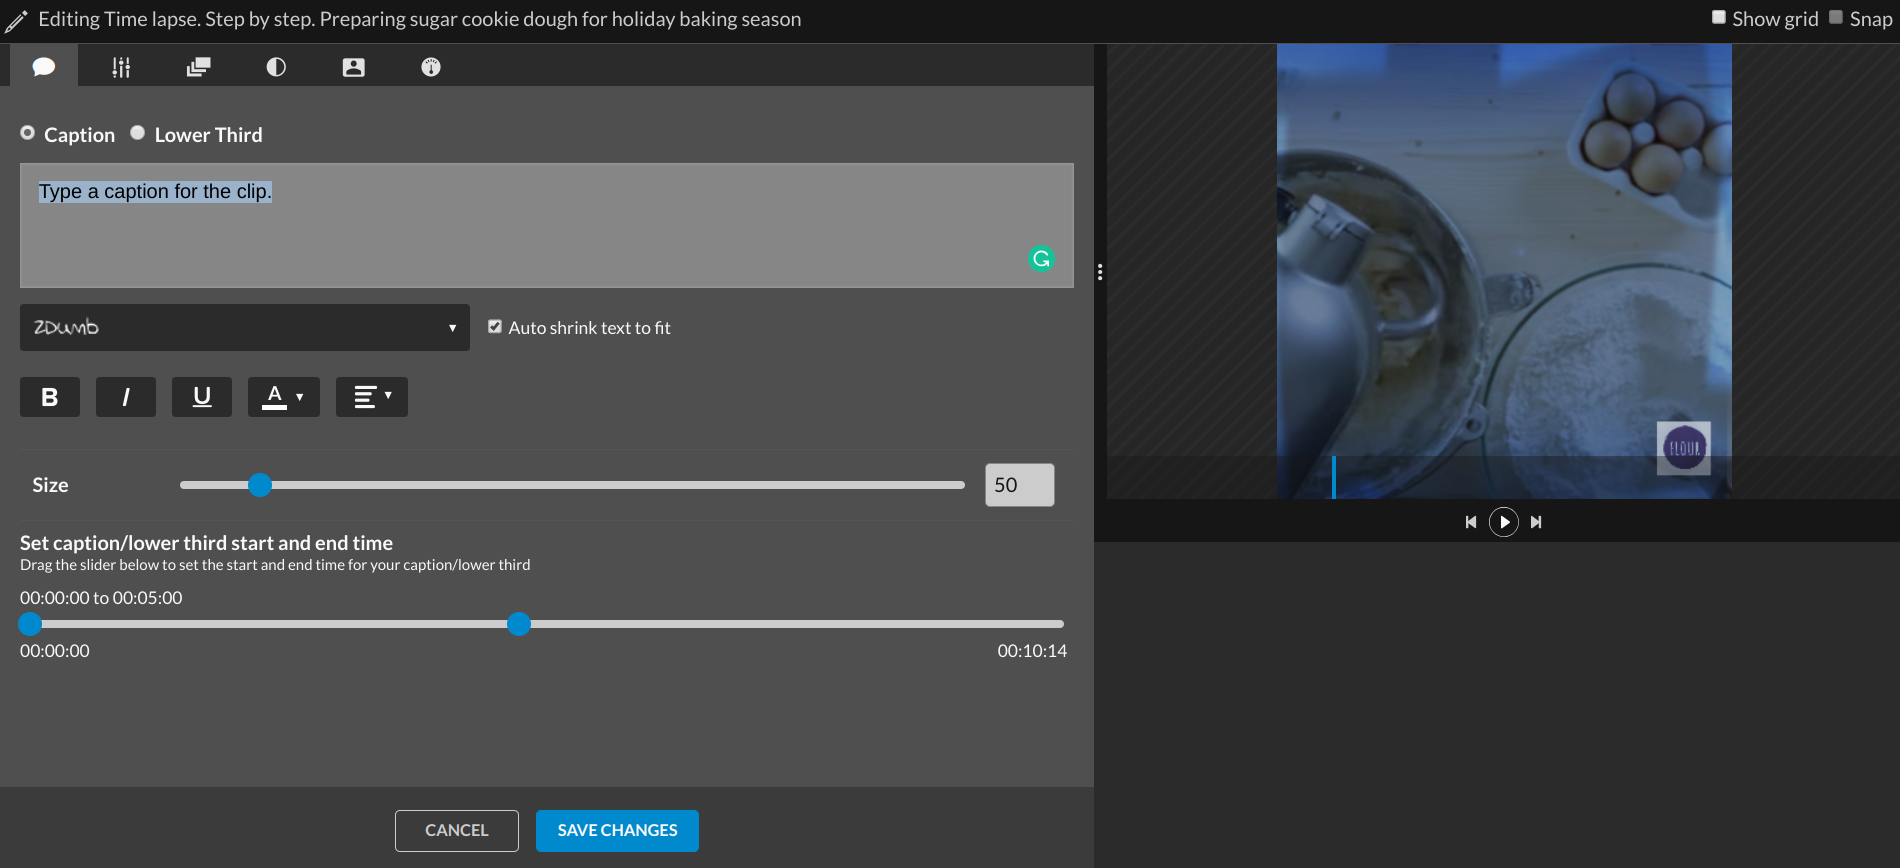
When you share videos online, you should always include subtitles as well as written calls to action.
To do this, click on the messages tab, and you can add text to your videos to add messages or subtitles:
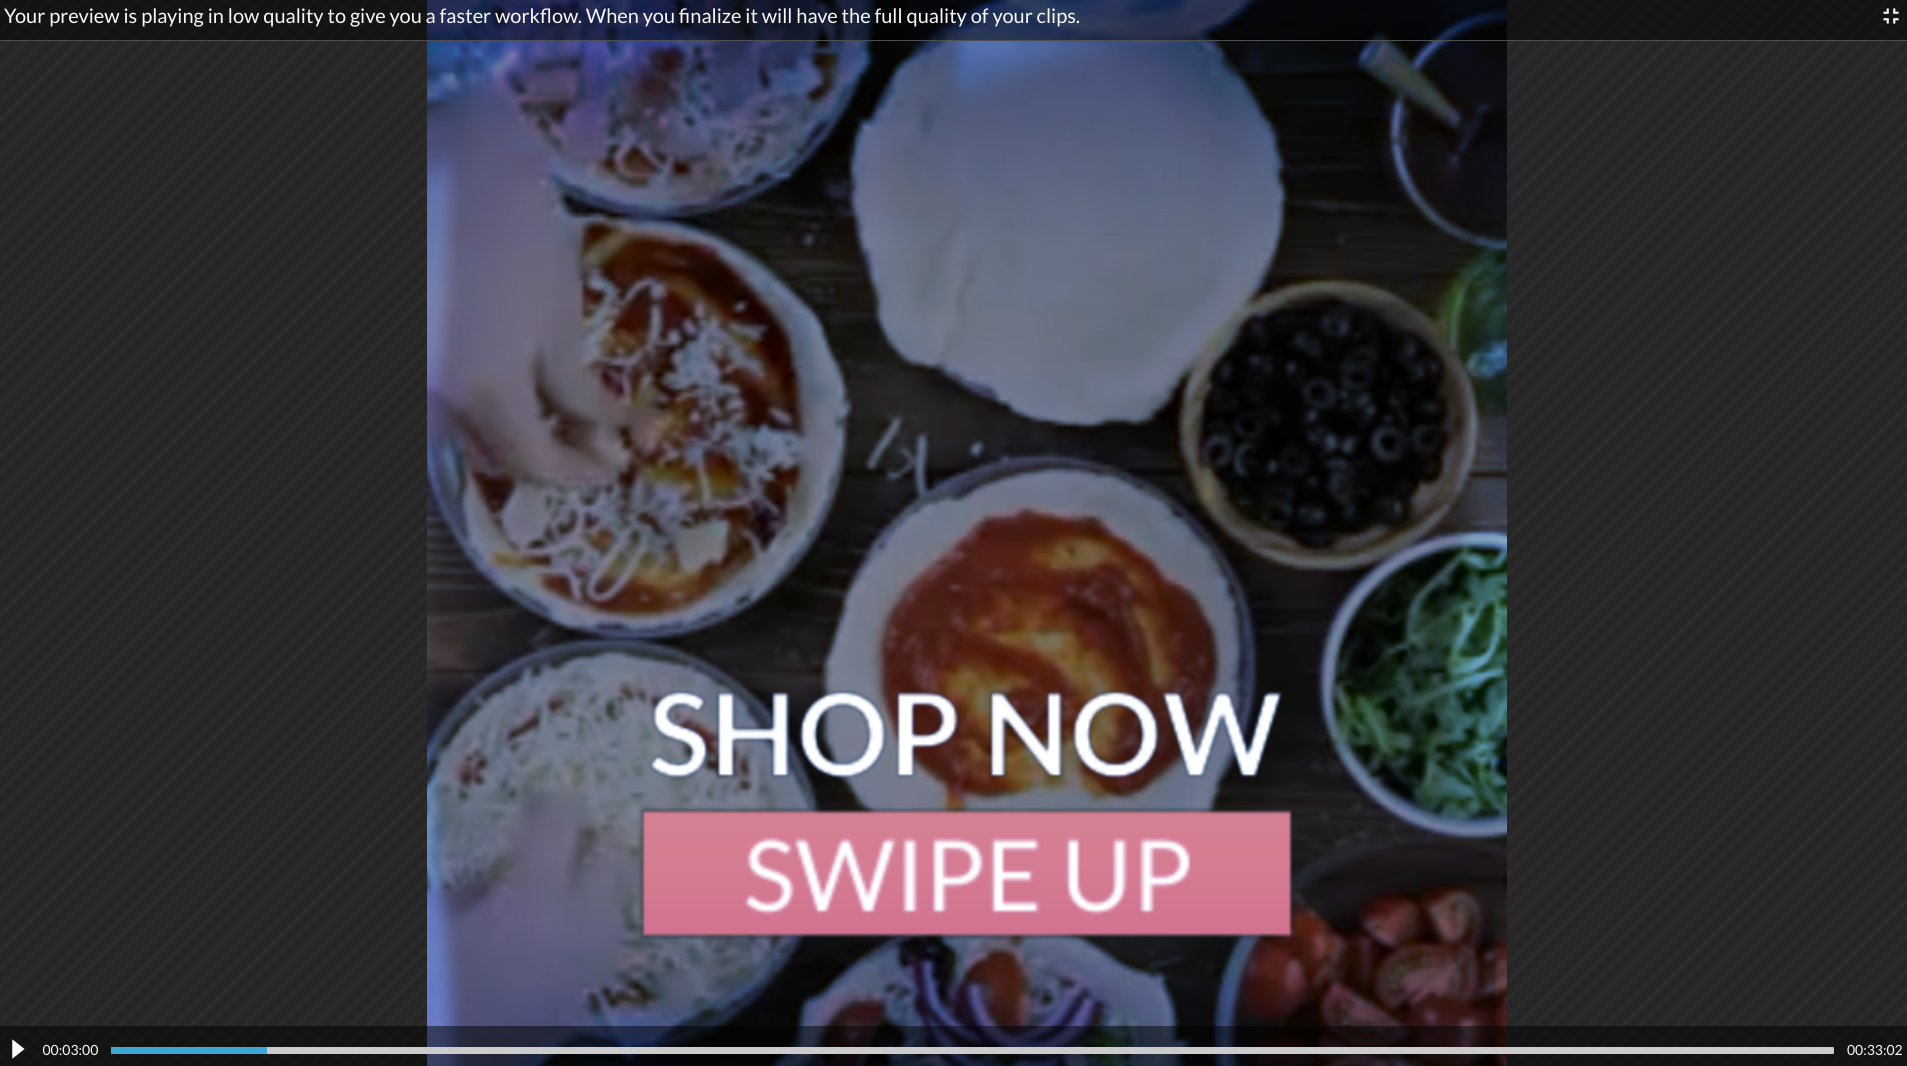
Here’s an example after deleting “Easy pizza dough” and adding “Shop now, swipe up.” All you have to do is drag the text to where you want it to show in your video.
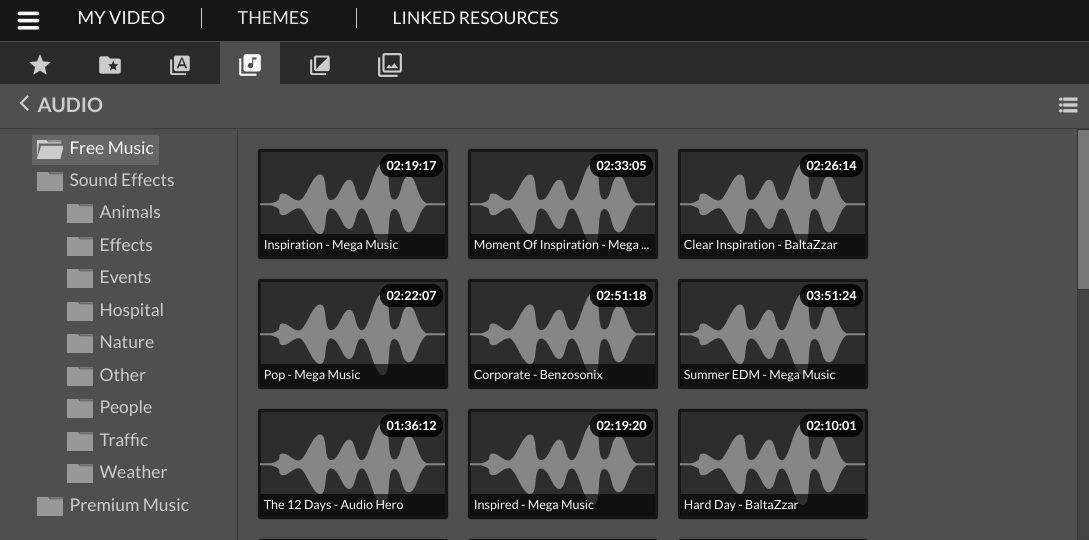
Apart from adding text and voiceover, you can also add music to your videos. Here, add either free music, sound effects, or premium music. The WeVideo Essentials stock library has over 100,000 songs so there are many options when it comes to finding a suitable one.
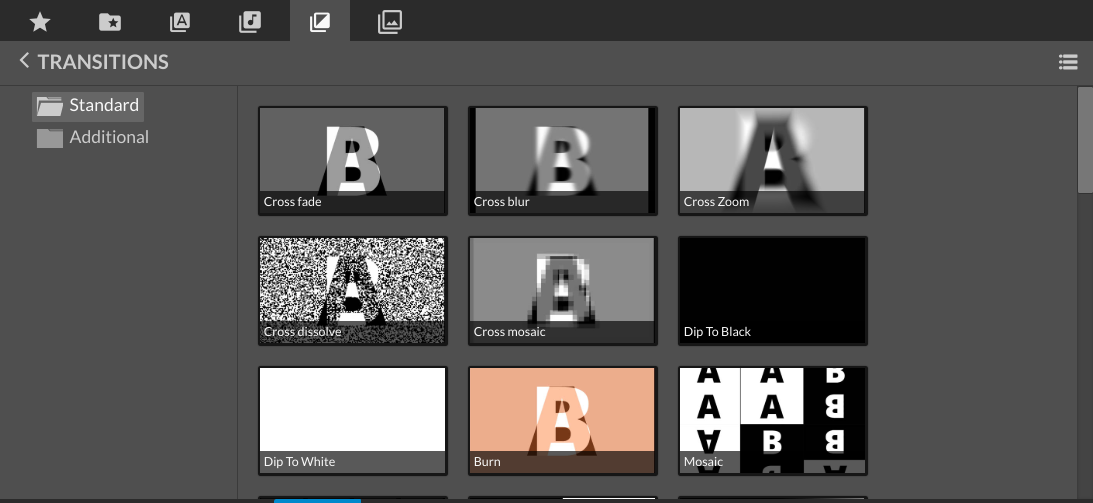
Besides music, there’s an option to add transitions to your video.
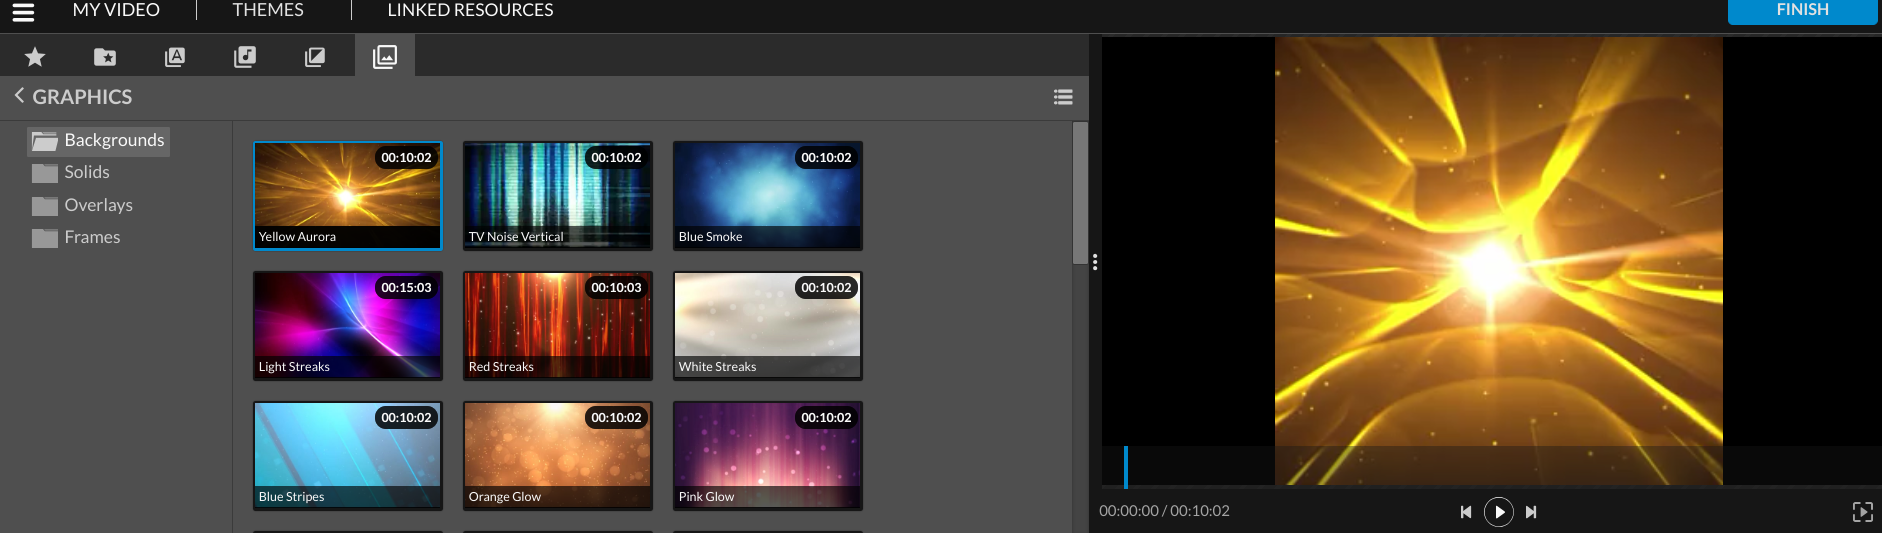
In the last tab, there are also graphics options to add to your video to make it stand out more:
WeVideo also allows you to edit different parts of your video, as needed, easily. When you click on a unique piece of media, you’ll see options at the top left corner.
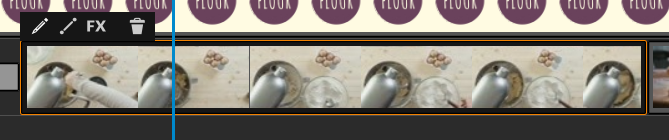
For instance, if you click on the pen button which opens the clip editor, you get this:
Here, you see editing options for your texts.
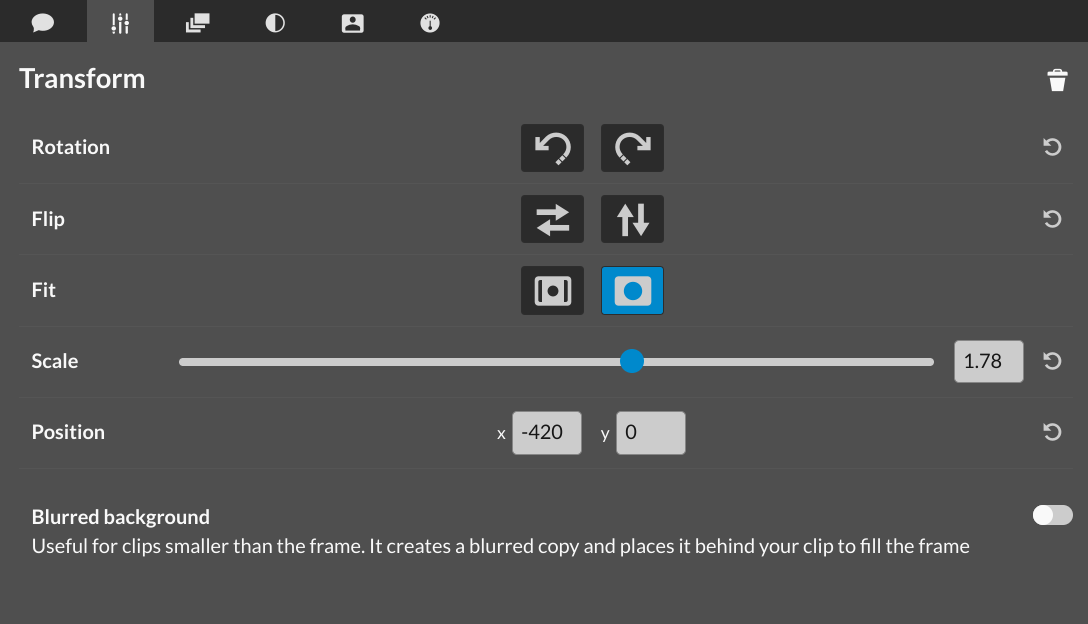
On the next tab, there’s the “Transform” tab which provides options to rotate, flip, scale, and perform other tasks.
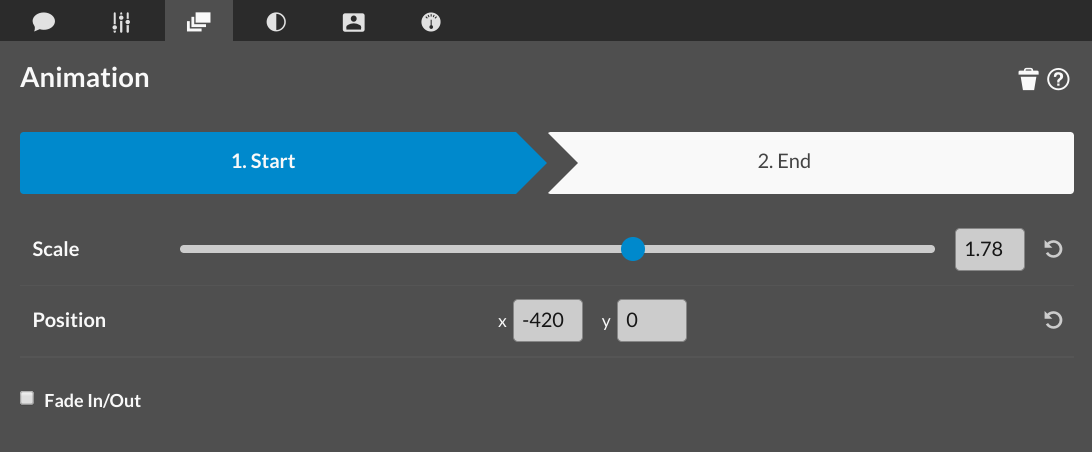
In the next tab, you have options to animate your video clip:
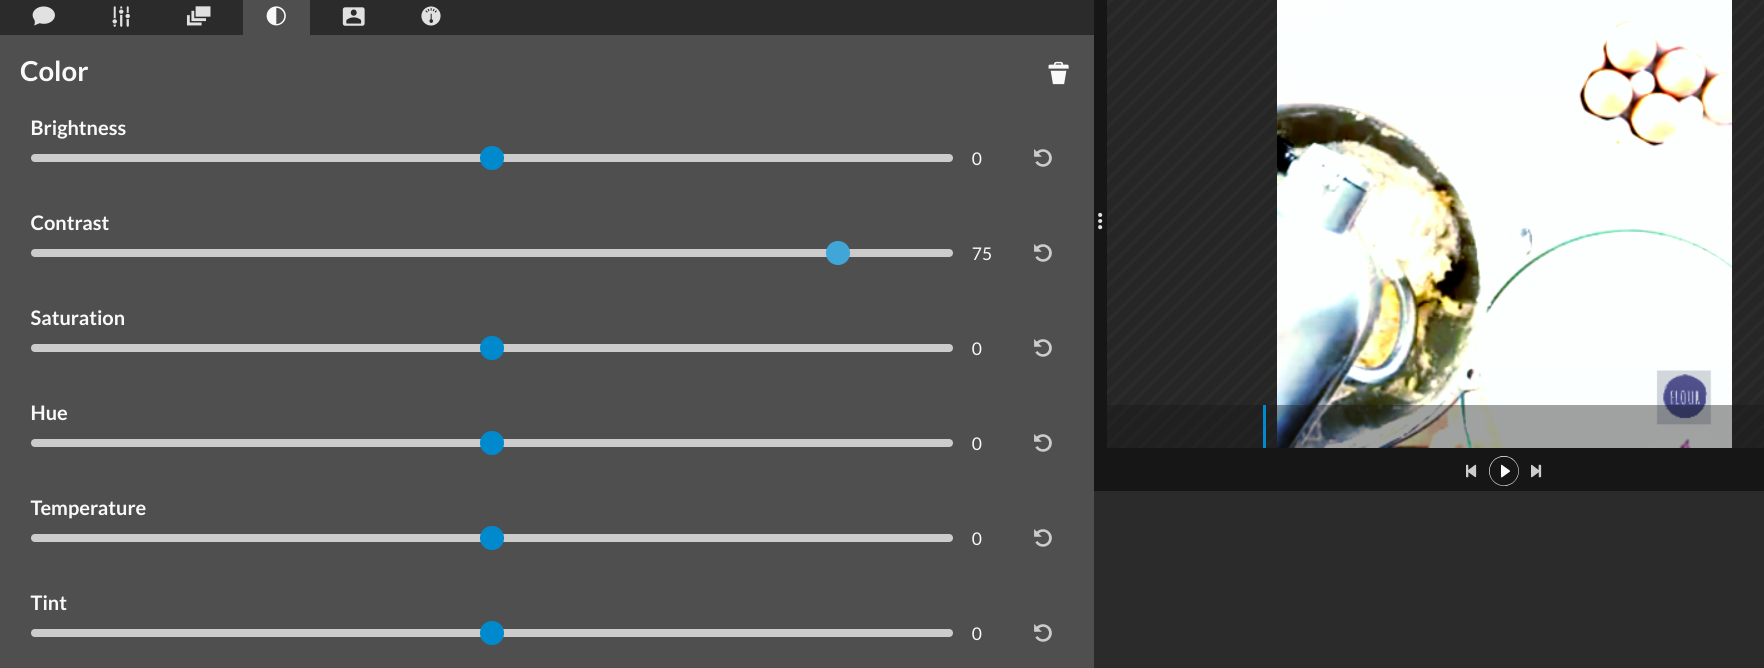
Furthermore, you can adjust different color aspects of your clip in the next tab to make it look perfect: brightness, the contrast, the saturation and more:
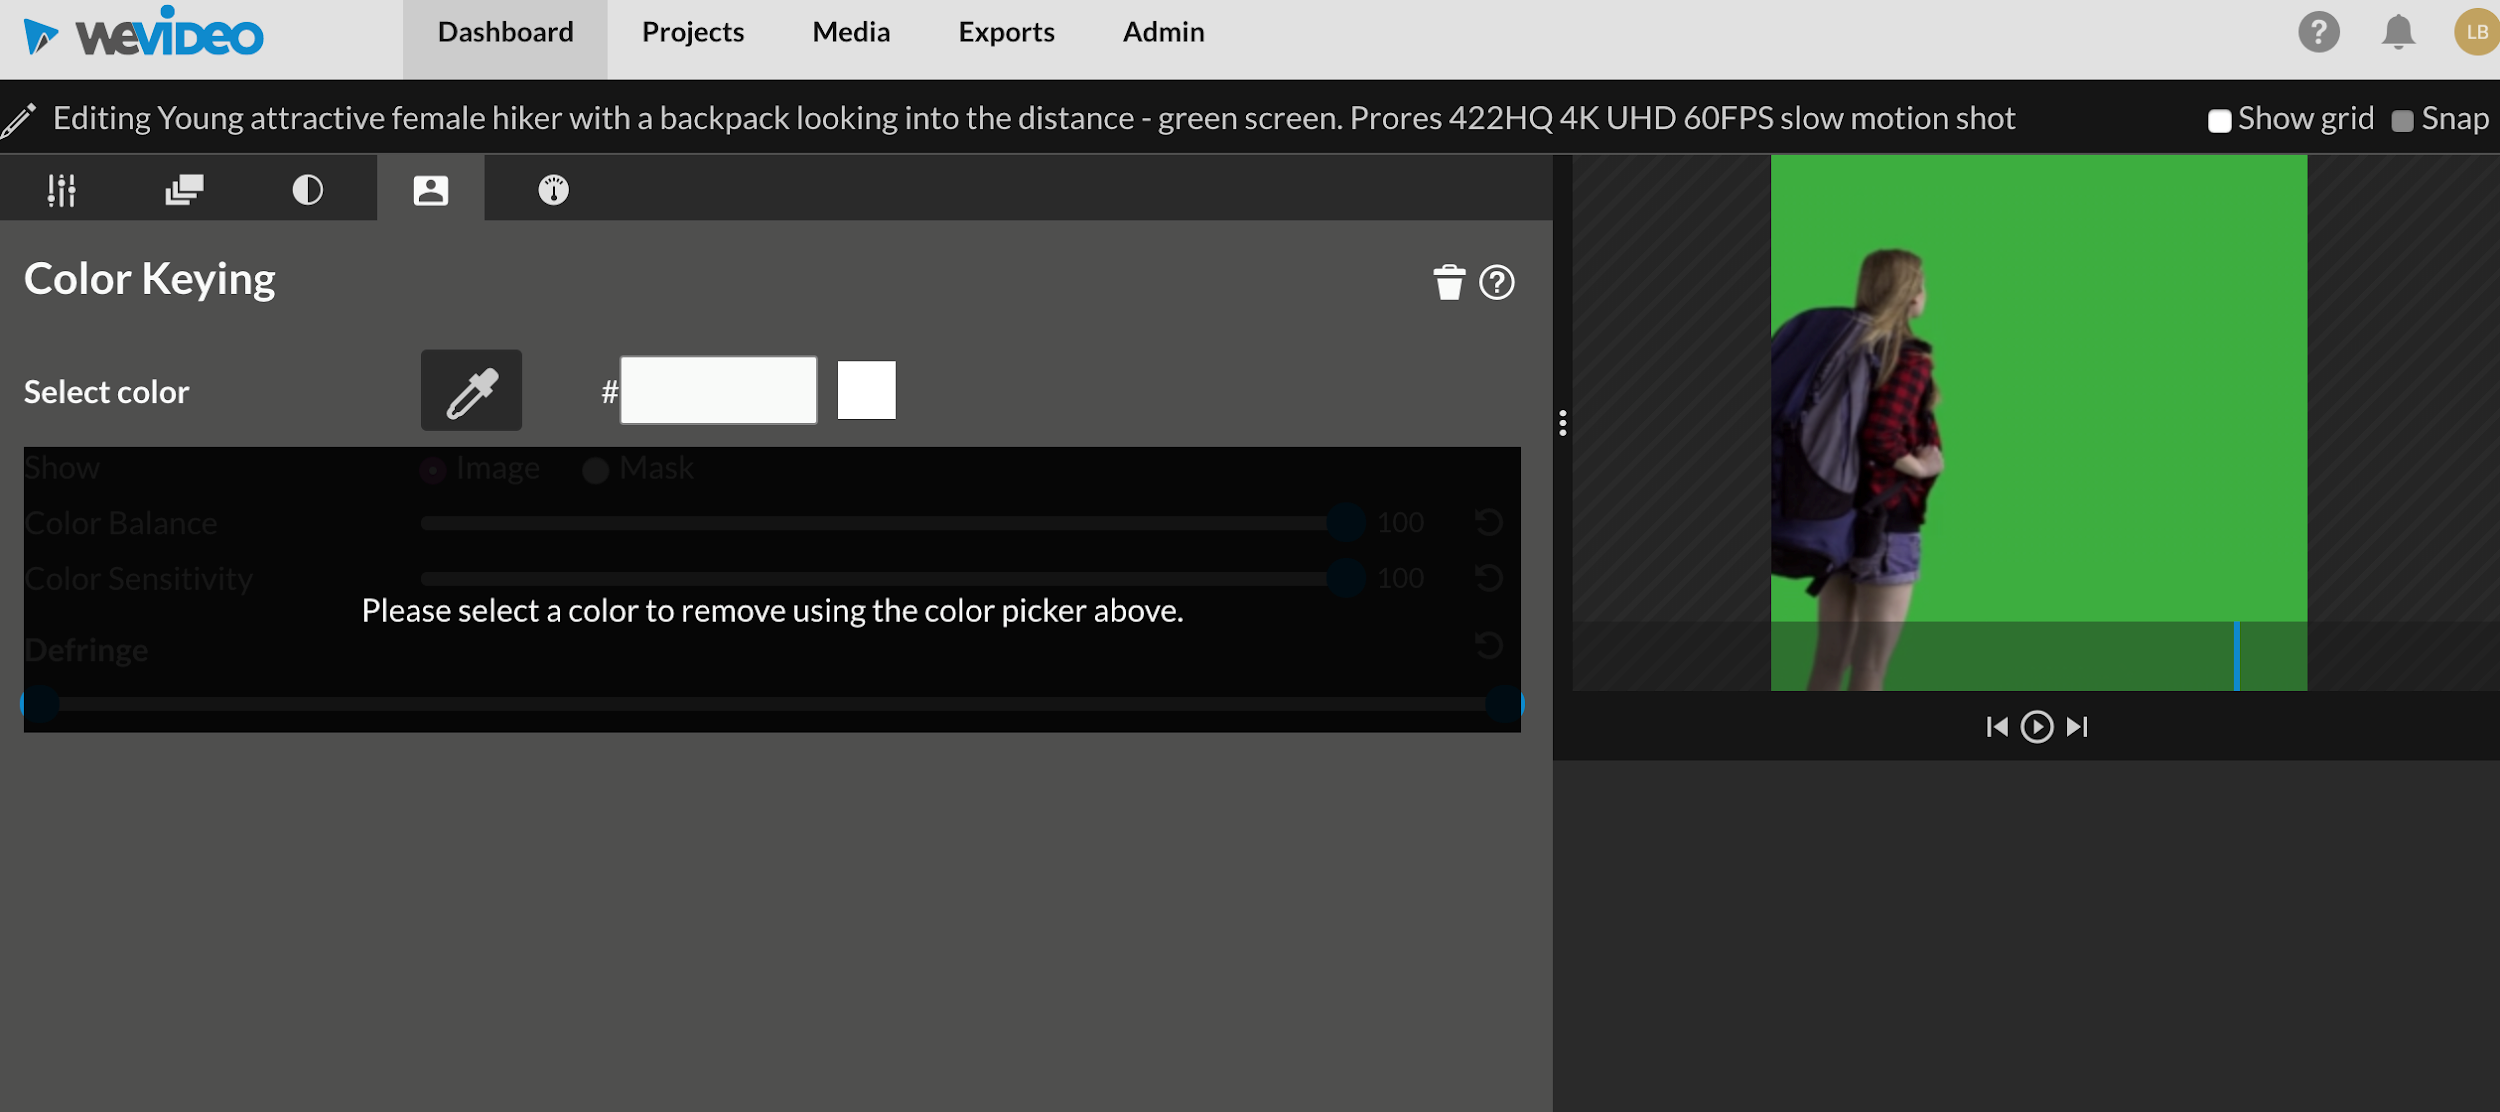
In the “Color keying” tab, you have the ability to key out a specific color and replace with another graphic or background of your choice — in other words, create a green screen effect:
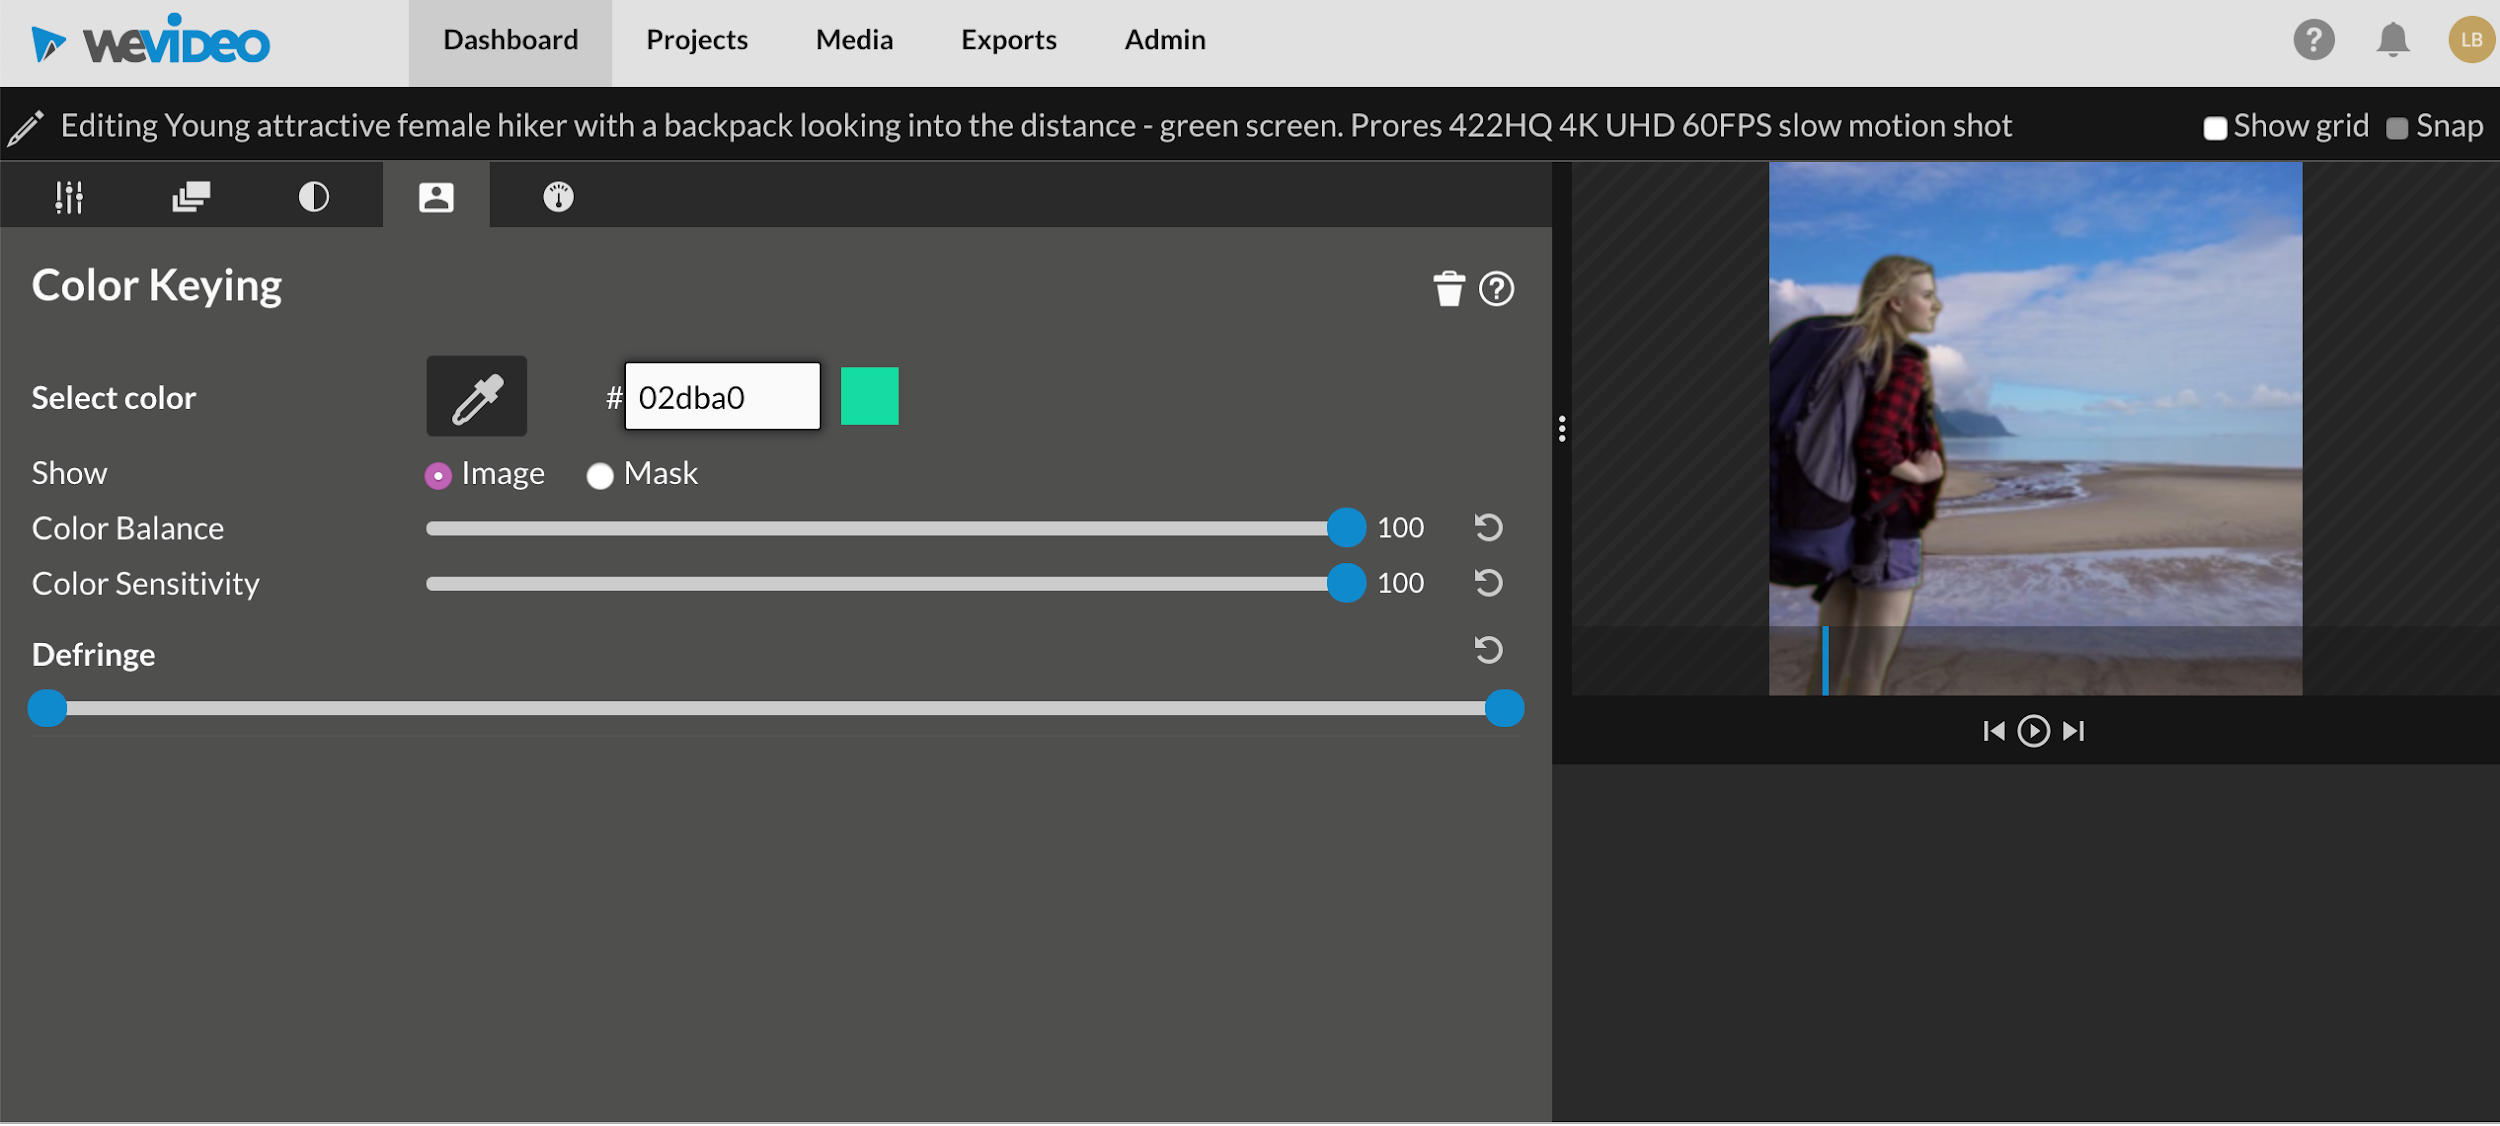
And once you add the color keying, you can add any other video you want as the background:
It literally takes a few seconds to do.
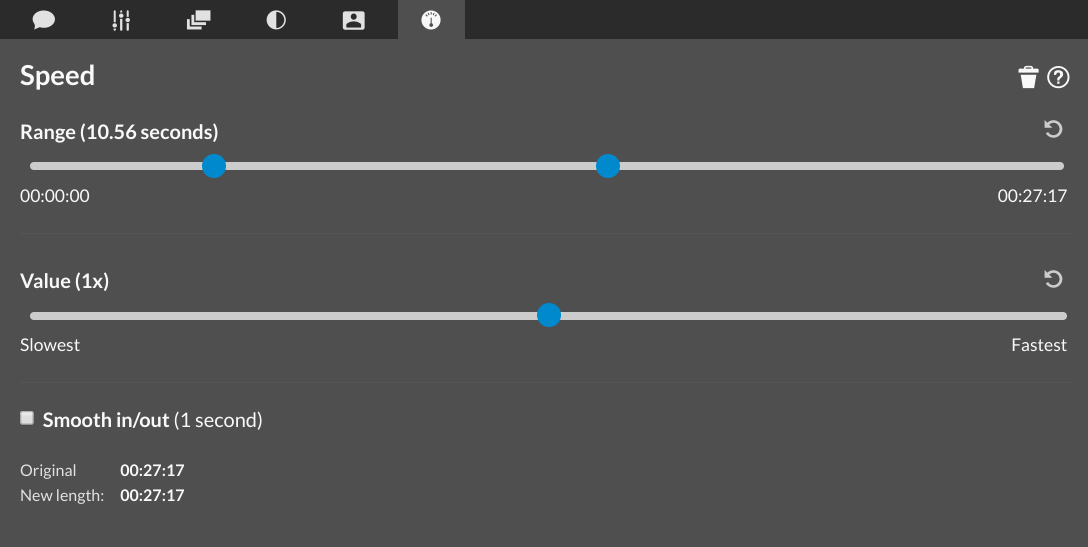
If you want to play your clip faster or in slow motion, this feature is available in the “Speed” tab.
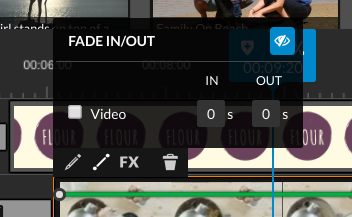
Apart from using the clip editor, other options you have for a clip are to open fade options, clip effects, or delete the clip. When you click on the fade option, you see the time for the clip to fade in and out.
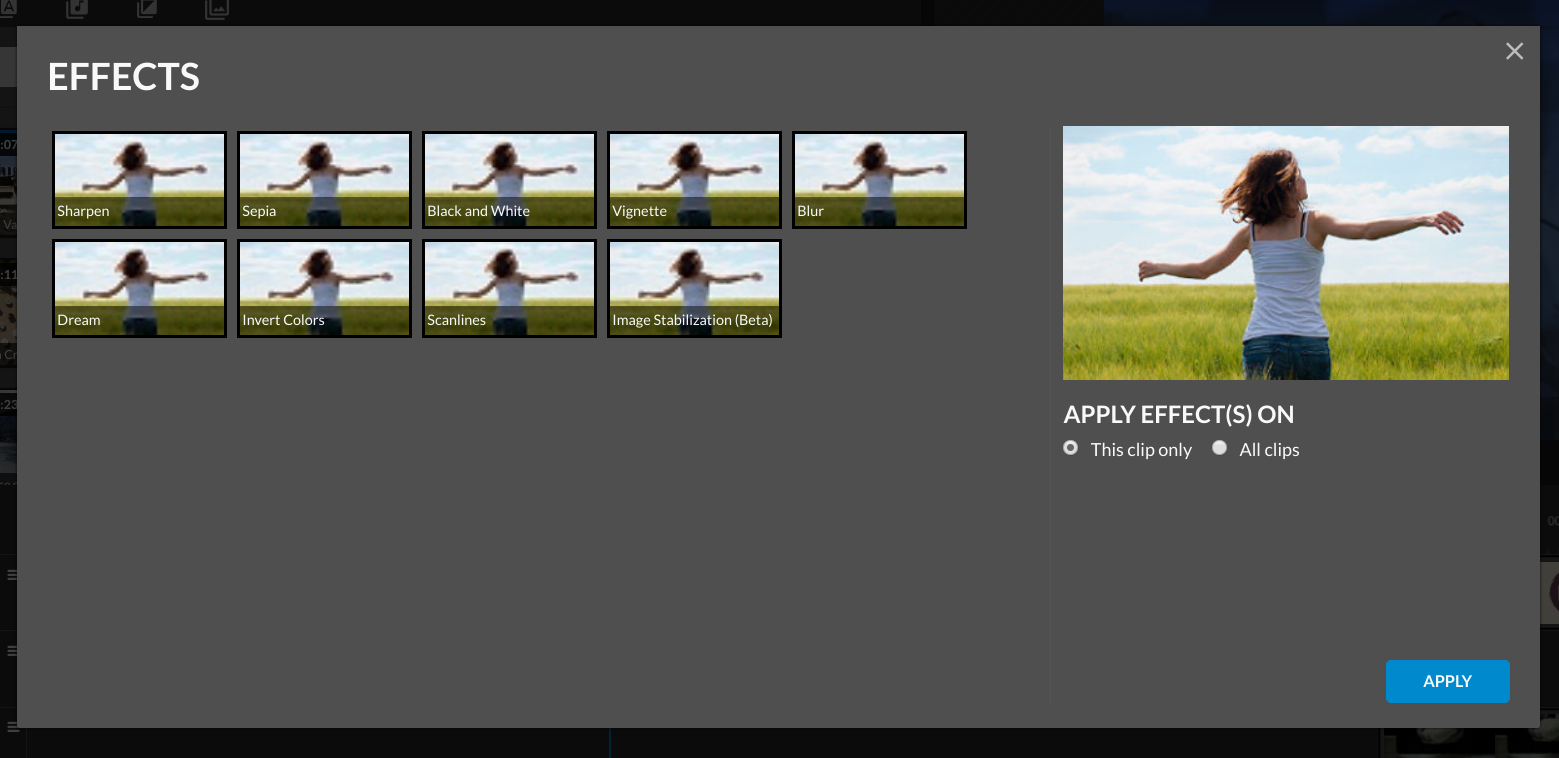
If you click on “FX,” it opens up options to apply effects to your clip.
Make your own template
Creating your own video templates is a great time-saver. This way, you can ensure 2 things:
- That all of your videos are consistent
- And that every video you create is in line with your branding.
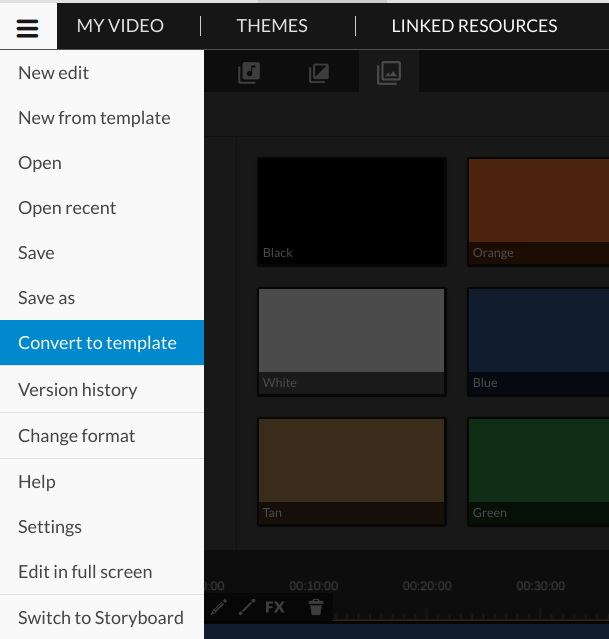
Creating your own templates is super easy to do once you’ve created a video; if you want to save a new edit as a template, simply click the drop-down at the top left corner of your page and select “Convert to template.”
Then, your templates will be saved so you can access them from your dashboard, easily.
For example, if you want to create social media videos, this is a super handy feature – save a template and just change the wording and some of the media, as required and you’re good to go.
Essentially, it’s a way to create branded, professional videos in a few minutes.
Publishing and sharing your project
Once you’re done editing your video, preview it before finishing. You need to keep in mind that WeVideo makes previews low quality to ensure a faster workflow – but rest assured, once it’s ready, the video will look amazing.
All you have to do is click on the play button or the play button in square to see a full-screen preview.
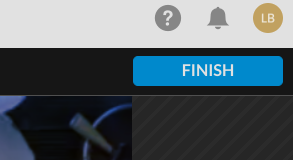
If you’re satisfied with the preview, click the “Finish” button at the top right corner of the editor to export your video.
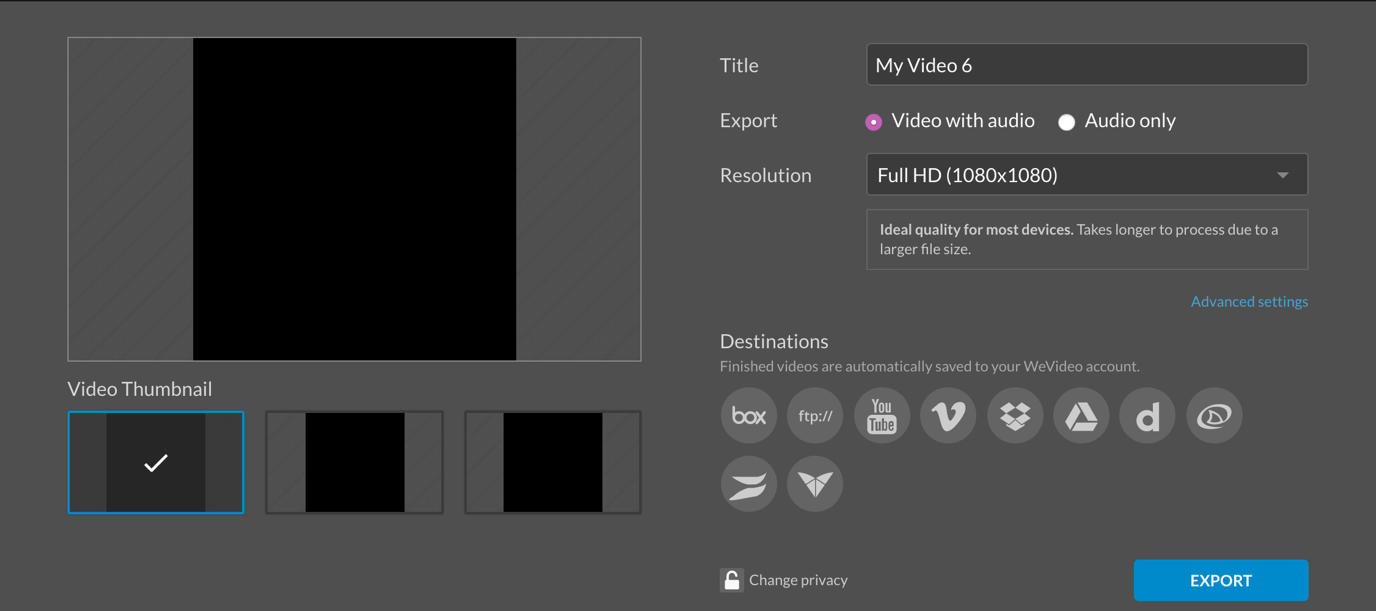
After that, you have to give a title to your video.
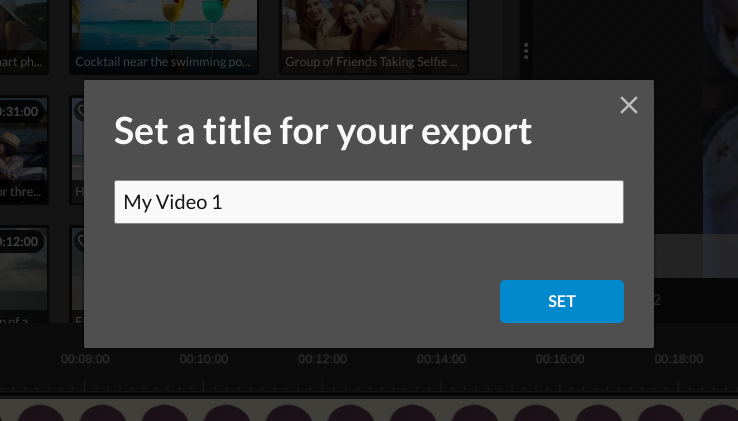
When you’re done with this, click “Set.” On the next page, you’ll be able to add finishing touches to your video. WeVideo allows you to pick one of 3 thumbnails that’s likely to attract viewers to your video.
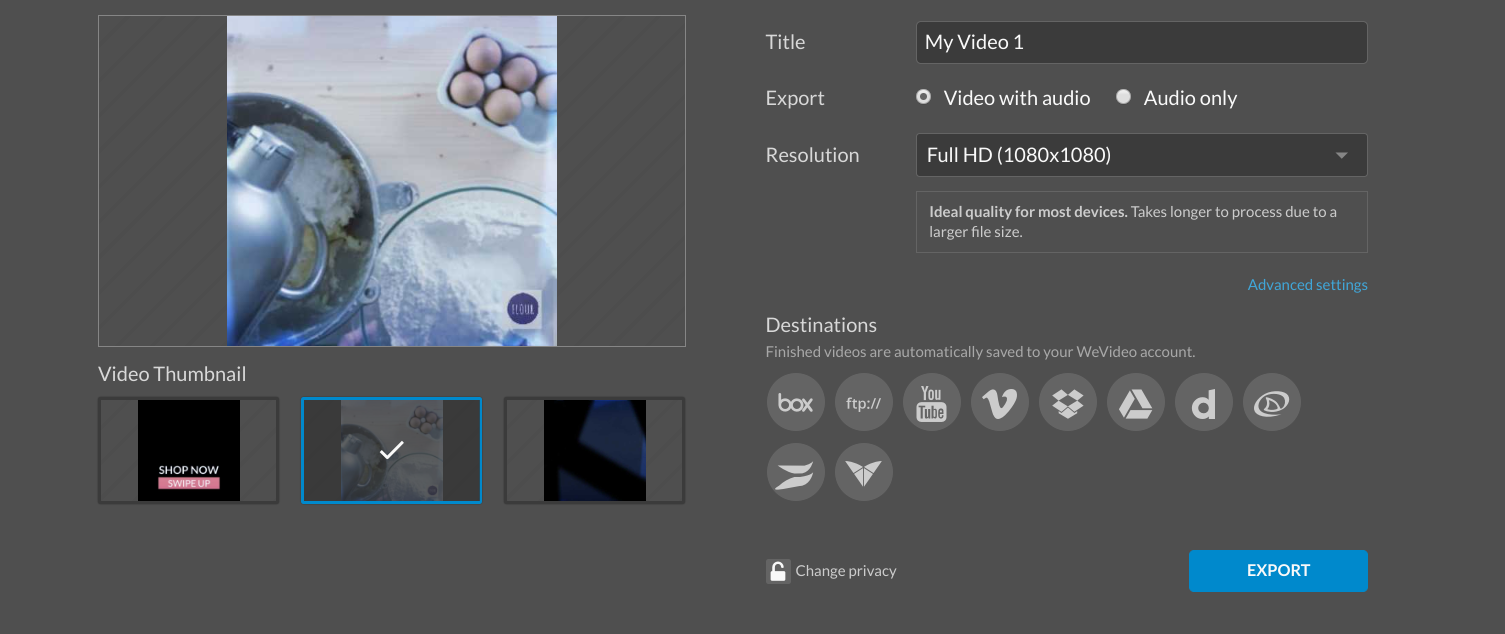
On the right side, you have the option to select your video resolution. While selecting a video resolution, you have to consider your audience and the medium of consumption.
For instance, an HD video will look great on social media as most people are viewing on the small screen of their smartphones.
WeVideo provides 3 resolutions which are:
- High definition (HD)
- Full high definition (FHD)
- Ultra-high definition (4K)
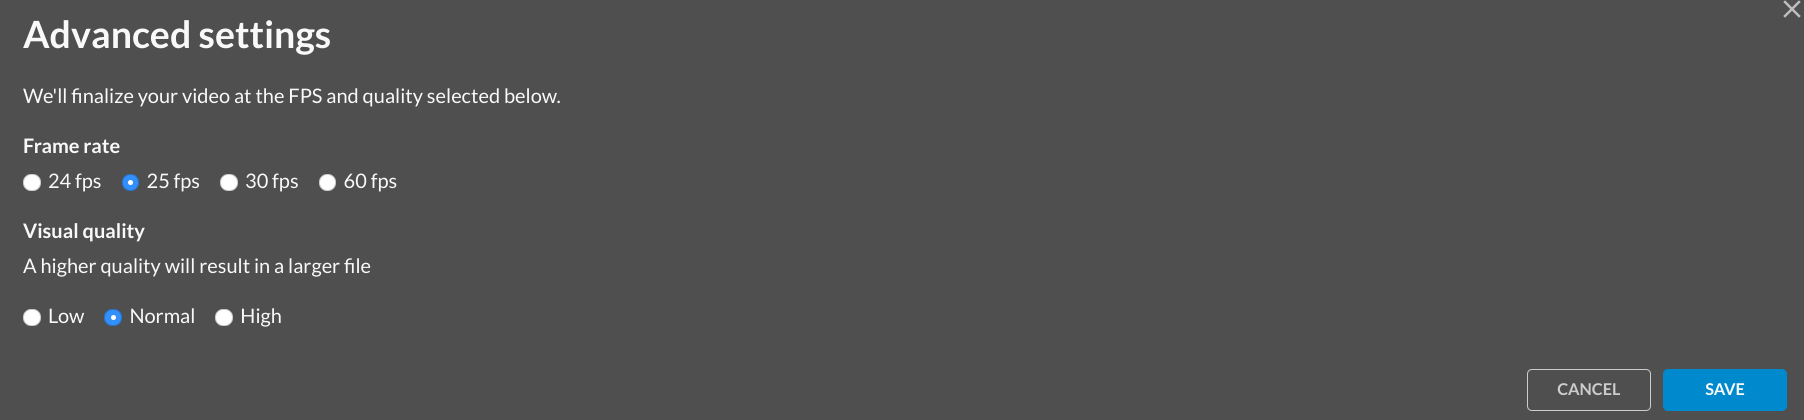
You’ll notice that the resolutions are square. That’s because I chose a square format before editing my video. If you click on “Advanced settings,” you’ll be able to set your video’s frame rate and quality.
After this, the next step is to select your destination.
The beauty of this is that you don’t have to keep a permanent video file on your device. If you’re editing a large video, you can export it directly to your Dropbox account or any of the other options.
First of all, you don’t have to waste time downloading to your device and then uploading to your online storage. Secondly, you can cut down on data usage.
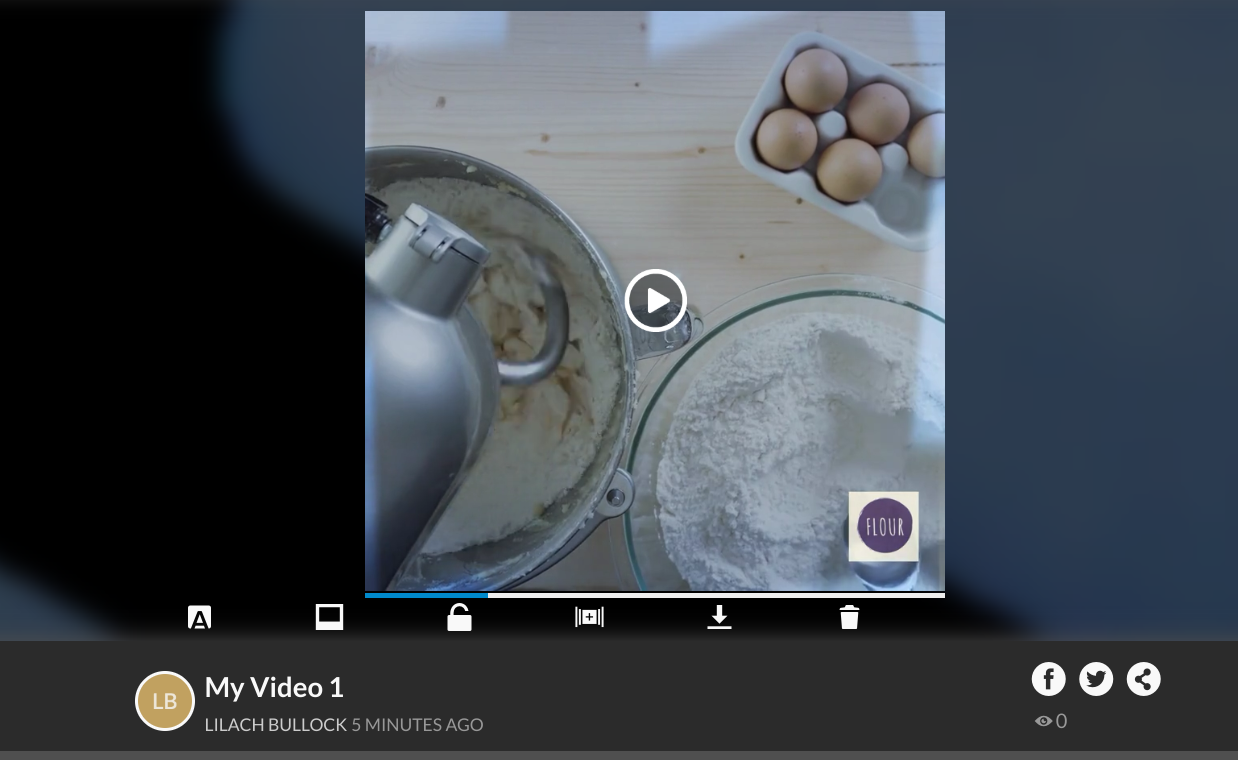
When you click the “Export” button, WeVideo prepares the high-resolution video for sharing and downloading.

If you click on the play button, you’ll see your video on another tab.
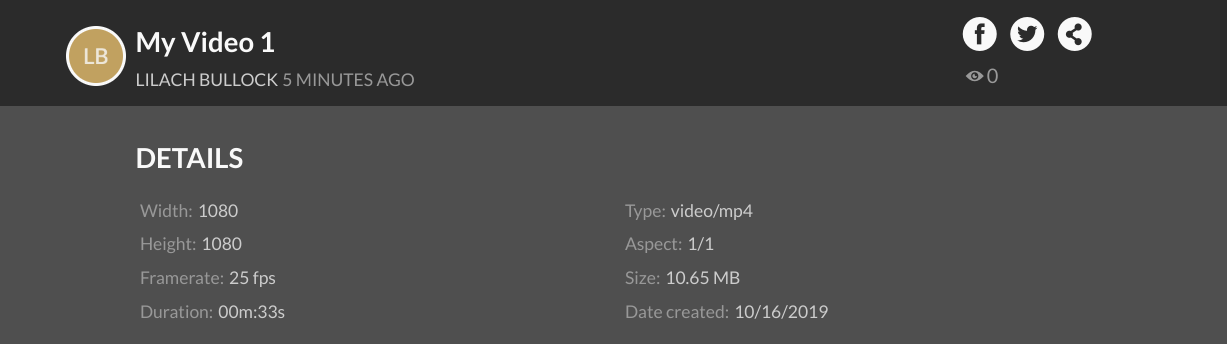
Scrolling down, you’ll find more details about your video.
But let’s say that maybe your video just needs finishing touches before you launch it on social media. WeVideo gives you an option to do just that.
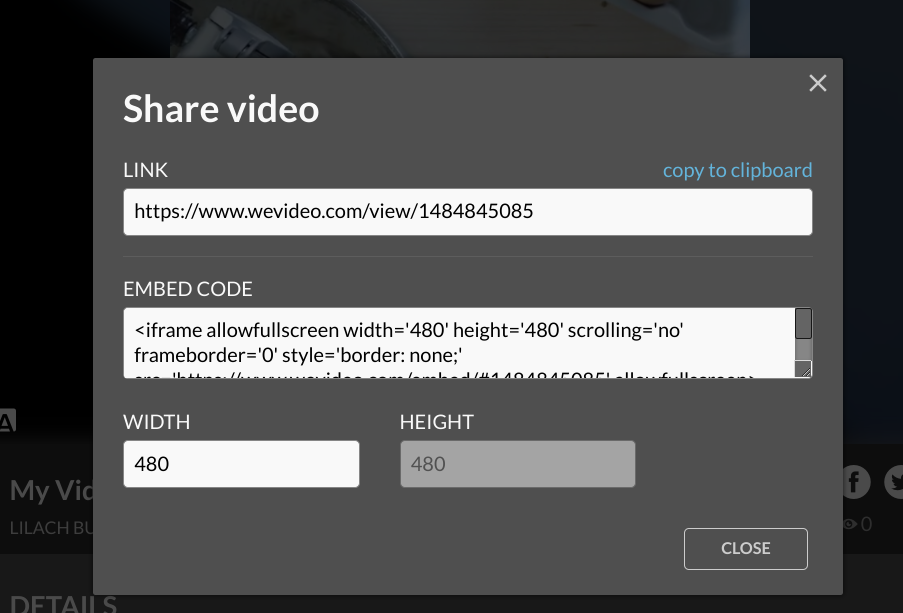
With the share button on the video page, you can share to Facebook or Twitter. Alternatively, you have the option to copy an embed code that’s usable on your website.
Collaborate with your team
Creating some videos requires teamwork to make it successful. Using WeVideo, collaboration with your team members is easier during the video creation process. To use this option, select “Collaboration” while creating a new project.

On the next page, you’ll find different ways to add members to your project.
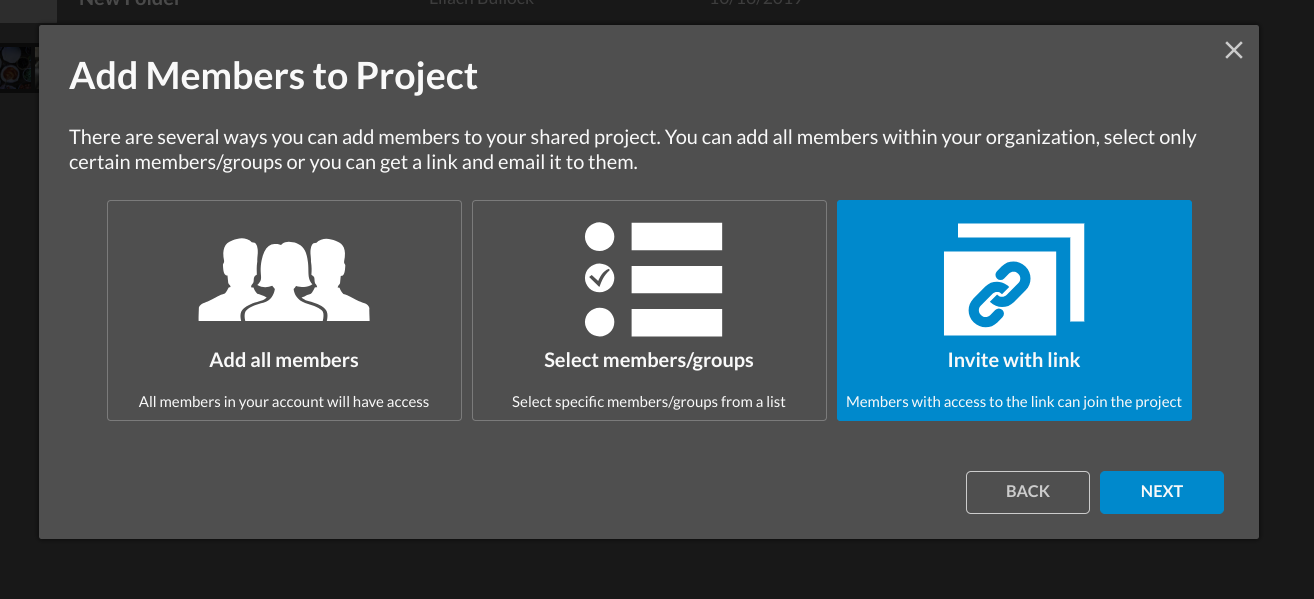
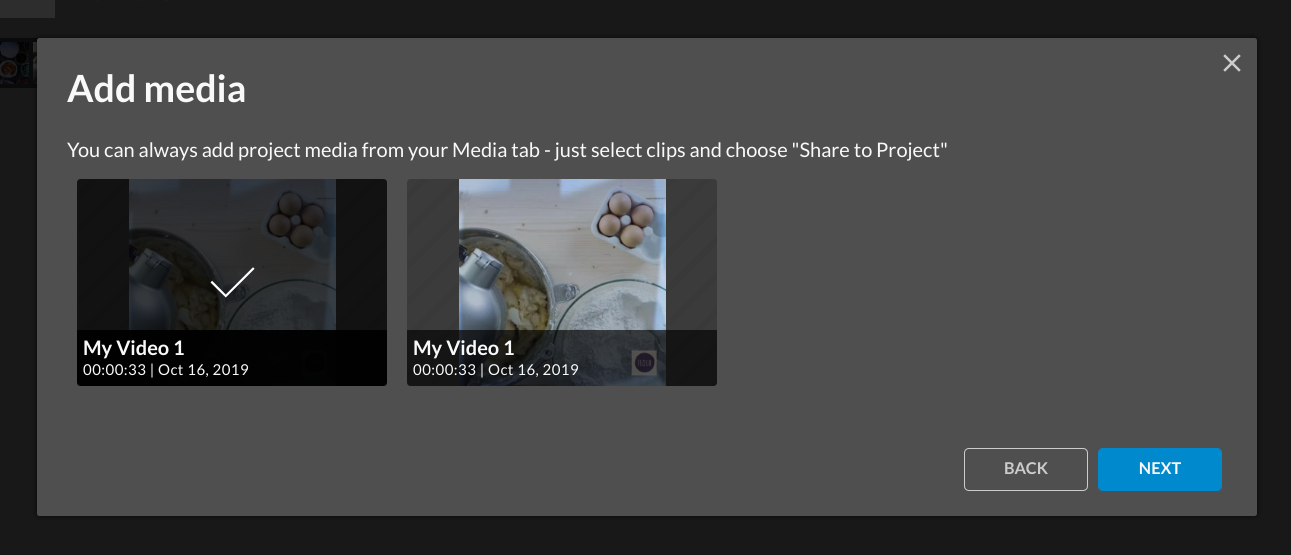
If, for instance, you selected “Invite with link,” you’ll have to pick a video in the next step.
After doing this, you’ll see the invite link to send to your team members.
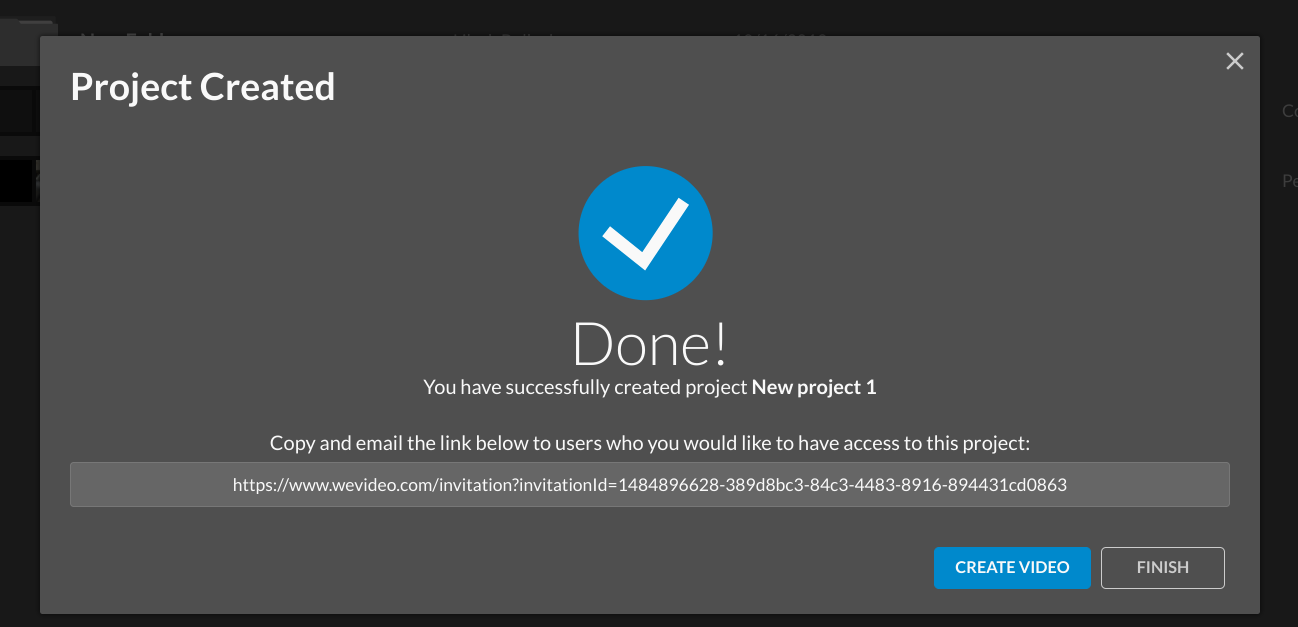
Once you’re done creating your project, you can add team members on your project page too.
What devices can you use for WeVideo?
Another really cool thing about WeVideo is that you can use it on multiple devices and easily change between these devices to continue your work with WeVideo JumpStart.
Some of the devices you can use it on:
- On your desktop browser (as it’s a cloud-based video creator)
- On a Chromebook
- On your iPhone or iPad (available to download here)
- On Android devices (get it here)
Basically, if you get a great idea and want to start working on your project immediately, you can use the mobile app and then once you have access to your computer, finish your project there (especially as the desktop version offers more versatility and extra features).
Conclusion
Picking a video editing tool depends on your needs. And that’s why it’s vital to have a list of the most important features you need from a video tool.
After doing that, ensure a prospective video tool meets these needs and check user reviews to confirm it’s a good fit.
WeVideo is a tool that provides extensive features to meet most of your video editing needs – after trying out so many different video editing tools, it definitely makes the top of my list.
So if you need to use videos for your business marketing campaigns and need to create them without a fuss, you should definitely check WeVideo out.
Have you tried WeVideo yet? Let me know in the comments section and please share if you enjoyed the post ☺

Follow Lilach